- Published on
tWIL 2022.07 2주차
- Authors

- Name
- eunchurn
- @eunchurn
이번 주는 API 보안과 관련하여 시행착오를 겪었다. 문서를 찾아보고 다시 익히는데 시간을 많이 쓴 것 같다. 하지만 이 보안과 인증 부분은 앱과 인프라를 빌드업하는데 있어서 매우 중요하기 때문에, 시간과 공을 많이 들여야하는 것은 맞는 것 같다. 언젠가는 k8s로 이 모든 것을 빌드해볼 수 있을지 궁금해지기도 했다.
Table of contents
Apollo server CSRF
작업중인 Client앱은 Amplify를 적용하고 있다. Cognito Auth와 Storage 그리고 MSA를 Lambda와 API Gateway로 구축하기 위함이다. 그리고 메인 RDS를 사용하는 GraphQL API는 Amplify의 생산성 한계로 인해 AWS Copilot로 ECS에 배포하였다. Copilot은 Amplify까지 IaC로 관리하지 못하기 때문에 DevOps 관리점은 크게 2군데(Copilot, Amplify)로 볼 수 있다. Amplify의 장점은 활용하기 나름 괜찮은면이 있어서, Cognito, S3, API Gateway, Lambda를 한곳에서 관리할 수 있으며, Copilot은 RDS, ECS, VPC, Target Group, ALB, System Manager, Secret Manager등을 관리한다.
Amplify Storage에서 파일 전송을 한 후 Protect, Private으로 설정된 파일들은 Cognito identity pool의 ID로 생성된다. 가끔 Third party API를 사용하여 다른 OSS를 사용할 경우 ECS로 배포된 API에서 이 파일들을 처리해야할 경우가 있다. 비즈니스 영역이 다른 곳이라 GraphQL API에 Upload 설정이 불가피했다.
GraphQL은 앞서서 이야기한 바와 같이. Nexus GraphQL과 Apollo Server(apollo-server-express) 그리고 Express를 사용한다. 즉, express 미들웨어로 Apollo server를 구동중이며, 업로드 설정은 app에서 미들웨어 설정을 한다.
import express, { Response } from "express";
import { graphqlUploadExpress } from "graphql-upload";

const app = express();
app.use(graphqlUploadExpress());
// omitted

export { app };
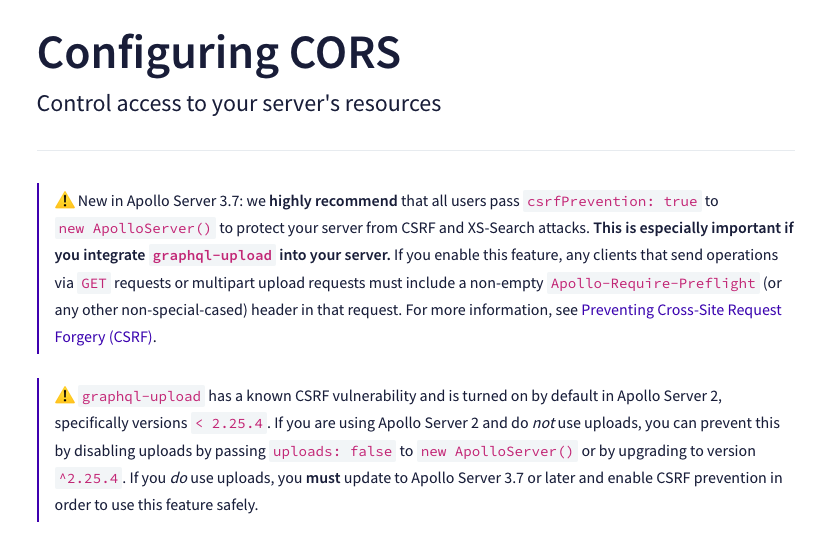
Apollo server는 3.7버전 이후부터 업로드를 사용할 때 서버 자원을 접근제어를 하도록 CSRF, Cross-Site Request Forgery csrfPrevention을 필수로 설정 하도록 가이드한다.
import { ApolloServer } from "apollo-server-express";
import { app } from "./app";

const server = new ApolloServer({
  schema,
  context,
  introspection: process.env.NODE_ENV !== "production",
  // omitted
  csrfPrevention: true,
  cache: "bounded",
});
// omitted

export async function runServer() {
  await server.start();
  server.applyMiddleware({ app, path: "/" });
  await new Promise<void>((resolve) => app.listen(Number(port), resolve));
  logger.info(`🚀 GraphQL service ready at http://localhost:${port}${server.graphqlPath}`);
}
클라이언트에서 ApolloLink는 apollo-require-preflight설정을 해주어야 File 객체가 readableStream과 함께 API로 넘어온다.
const httpLink = createUploadLink({
  uri,
  headers: { "apollo-require-preflight": true },
});
Apollo Client with Hook

Apollo client(React)와 Apollo server 그리고 Apollo studio는 아래 그림과 같이 연결하여 사용해왔다.
GraphQL schema의 Introspection을 허용하지 않는 경우, 그리고 Apollo studio를 사용하지 않는 경우 클라이언트가 사용할 스키마 SDL파일을 개발자끼리 주고 받거나 했어야 했나. 이전에는 Introspection query를 허용했었다. 모든 소스에서 이 스키마를 공개한다는 것이 꺼림칙했는데, Apollo server v3에서 Apollo studio를 sandbox형태로 제공하면서 sandbox 형태가 아닌 studio도 어느정도 이해하게 되었다. 특히 @apollo/rover를 통해 스키마를 옮기고, Apollo server는 studio로 Operation들의 metric을 보내주는 형태로 Apollo studio를 사용하며 편리함을 느끼고 있었다. 여기에 Apollo Federation이 나오게 되면서 supergraph와 subgraph를 적용하여 Open source 형태로 구축한 서버 혹은 컨테이너와 AppSync등 여러 클라우드에서 만든 GraphQL 서버도 Studio에서 통합하여 사용할 수 있도록 subgraph를 composition 할 수 있게 되었다.

Apollo client를 사용하는 묘미는 GraphQL-codegen 플러그인 중에 TypeScript React Apollo 플러그인을 사용하며, 우리가 사용할 모든 GraphQL operation을 React hooks로 만들어 줌으로써 TypeScript 타입만 만들어 useQuery, useLazyQuery, useMutation을 만드는 방법보다 use{Operation Name}Query, use{Operation Name}LazyQuery, use{Operation Name}Mutation등의 hook을 만들어 줌으로 프론트개발자 생산성에 많은 기여를 한다.
Authentication/Authorization
지금까지 Nodejs로 Nexus GraphQL과 Apollo server로 GraphQL API를 만들어 오면서 Context에 request.headers.authorization에 담긴 토큰으로 인증 및 인가를 처리하고 이 토큰에 담긴 Role에 의해 각 GraphQL의 field에 fieldAuthorzation 플러그인을 사용하여, 인가(authorization)권한을 부여하였다. 이정도만 해도 문제가 없지 않을까 생각했지만, 이 API는 모든 소스에게 열려있고 누구든 접근할 수 있는 상태이기 때문에 문제가 될 수 있다. 분명 로그인이나 회원가입 그리고 이메일 중복 체크와 같은 public으로 공개해야하는 엔드포인트도 문제가 될 수 있다는 것을 알았다. ALB나 API Gateway를 사용할 경우 디도스 공격은 막아주긴 하지만 원천적으로 막아 놓은 상태여야 어떤 악의적인 공격에서도 API의 자원을 내어주지 않을 것이다. Unauthenticated rule에 의한 API 접근을 알아보았다.
Apollo client link with Amplify Auth
시작하기전에 Amplify로 설정한 backend의 Auth를 사용하려면, 일단 앱이 단순한 경우 Authenticator의 Provider를 사용하면 된다. Amplify는 정말 너무도 편하게 사용자 로그인관련 UI를 모두 제공한다. 하지만 이 말은 커스텀하게 바꾸기는 어렵다는 말이 된다. 그리고 Amplify GraphQL API를 사용하지 않으면, 골치아픈 작업들을 적용해야한다. 여기서는 Apollo Server에 Apollo Link를 만드는 작업을 시도해보았다.
Apollo client에 async 형태의 setContext링크를 만들 경우가 있었다. 외부 경로 fetch후 header값을 설정하는 경우가 있는데 다행이 setContext의 setter에 Promise를 허용하여 사용하면 되지만, Amplify를 이용한 클라이언트에서 API 로드밸런서 인증을 통과하기 위한 클라이언트 링크 작업이 필요했다.
import { setContext } from "@apollo/client/link/context";
import { Auth } from "aws-amplify";

const asyncAuthLink = setContext(
  () =>
    new Promise((resolve, reject) => {
      Auth.currentSession()
        .then((token) => {
          const accessToken = token.getAccessToken();
          resolve({
            headers: { authorization: `${accessToken.getJwtToken()}` },
          });
        })
        .catch(reject);
    })
);

여기서 Amplify의 UI 이벤트 핸들러인 Hub를 사용한다. Amplify에서 사용하는 이벤트를 받을 수 있고, auth 이벤트가 발생할 경우 이벤트 조건에 따라 Apollo Client의 client의 link를 변경하도록 한다. 여기서는 로그인 했을 때와, 로그아웃한 경우의 조건으로 나누어 addListeners함수를 만든다.
let amplifyAuthLink: AuthLink | null = null;
/**
 * It listens for events from the Amplify Auth library and updates the `amplifyAuthLink` variable
 * accordingly. Add Hub auth listeners, to detect sign-in/out.
 * @param {string} region - The AWS region you're using.
 * @param {string} url - The URL of the GraphQL API.
 * @returns A function that takes an object with a payload property and returns nothing.
 */
export const addListeners = (region: string, url: string) => {
  // eslint-disable-next-line @typescript-eslint/no-explicit-any
  const handleAuthEvents = ({ payload }: { payload: any }) => {
    switch (payload.event) {
      case "signIn":
        amplifyAuthLink = createCognitoAuthLink(payload.data.signInUserSession, region, url);
        break;
      case "signOut":
        amplifyAuthLink = createIamAuthLink(region, url);
        break;
      case "configured":
      case "signIn_failure":
      case "signUp":
      default:
        break;
    }
  };
  Hub.listen("auth", handleAuthEvents);
  return handleAuthEvents;
};
링크가 끊어질 때 제거할 리스너 함수 removeListeners는
/**
 * It removes a listener from the Hub
 * @param {HubCallback} handler - The function that will be called when the event is emitted.
 */
export const removeListeners = (handler: HubCallback) => Hub.remove("auth", handler);
Apollo client 생성
Apollo client는 여러 링크 마지막에 httpLink를 사용하지만, 여기서는 파일 업로드도 미들웨어로 사용하기 위해 uploadLink를 httpLink로 사용하고(httpLink가 포함되어 있음, 백엔드에 파일 업로드 csrf 설정이 되어있기 때문에 preflight 요청이 헤더에 포함되어야 한다.) 여기서는 주목해야할 부분은 asyncAuthLink과 createIamAuthLink이다. 원래는 그림에서 보였듯이 조건부 링크를 위한 amplifyAuthLink가 붙어야 한다. jwt토근 기반 인증으로 일단 public API로 전환한 상태이다(잘 안됐기 때문에...). 이건 후에 설명하기로 하고, Apollo client는 아래 함수로 생성하며, 이 함수는 useApolloClient hook으로 실행된다.
/**
 * It creates an Apollo Client that uses the IAM Auth Link to authenticate with AWS AppSync, and then
 * uses the Upload Link to send GraphQL requests to AWS AppSync
 * @param {string} region - The AWS region where your AppSync API is deployed.
 * @param {string} uri - The endpoint of the GraphQL API.
 * @returns A new ApolloClient instance.
 */
const createApolloClient = (region: string, uri: string) => {
  const httpLink = createUploadLink({
    uri,
    headers: { "apollo-require-preflight": true },
  });
  return new ApolloClient({
    cache: new InMemoryCache(),
    link: from([
      // createIamAuthLink(region, uri), // IAM Auth token setup
      asyncAuthLink, // jwt setup
      httpLink,
    ]),
  });
};
/**
 * It creates an Apollo Client, and then adds and removes listeners to update the client when the
 * region or uri changes
 * @param {string} region - The region you want to connect to.
 * @param {string} uri - The URI of the GraphQL endpoint.
 * @returns A function that returns an ApolloClient.
 */
export const useApolloClient = (region: string, uri: string) => {
  const [client] = React.useState(() => createApolloClient(region, uri));
  React.useEffect(() => {
    const handler = addListeners(region, uri);
    return () => removeListeners(handler);
  });
  return client;
};
Apollo links
여기에 쓰인 Apollo Link들은 4개이다. createAuthLink, createCognitoAuthLink, createIamAuthLink, cachedAmplifyAuthLink 모두 다 쓰는 것은 아니고, 필요에 따라 스위치하도록 만들려고 했다. 초기에 밝혔듯이 API는 API Gateway에 물릴 생각이다. 즉, execute-api로 Signed 헤더를 셋팅해야 한다. 그러나 aws-appsync-auth-link는 appsync라는 요청으로 보내게 된다. 결국 API Gateway는 InvalidSignedException을 뱉어낸다. console에서는 CORS를 뱉기 때문에 Network탭에서 Response 오류를 보면 에러를 볼 수 있다. 즉, API Gateway나 ALB에 Cognito인증 헤더를 보내기 위해서는 aws-appsync-auth-link를 고쳐서 만들어야 하는 결론이 나왔다. 그래서 일단 API를 인증없이 오픈해놓고 jwt 토큰만 내려보내게 해놓았다. 즉 Apollo server 에서는 토큰으로 사용자 context를 읽고 처리는 가능하다. 추후 이 Link는 만들어야 한다.
import { ApolloLink } from "@apollo/client";
import { setContext } from "@apollo/client/link/context";
import { Auth, Hub } from "aws-amplify";
import type { HubCallback } from "@aws-amplify/core";
import { CognitoUserSession } from "amazon-cognito-identity-js";
import { AUTH_TYPE, createAuthLink as awsCreateAuthLink, AuthLink } from "aws-appsync-auth-link";

/**
 * It creates an ApolloLink that uses IAM/Cognito based on sign-in state.
 * Uses a cached AuthLink created by aws-appsync-auth-link under the covers.
 * @param {string} region - The region of the user's identity pool.
 * @param {string} url - The URL of the GraphQL API.
 * @returns A new ApolloLink that is a concatenation of the cachedAmplifyAuthLink and a new ApolloLink
 * that is a request handler.
 */
export const createAuthLink = (region: string, url: string) => {
  return cachedAmplifyAuthLink(region, url).concat(
    new ApolloLink((operation, forward) =>
      operation.getContext().amplifyAuthLink.request(operation, forward)
    )
  );
};

/**
 * Create an AWS AuthLink that uses Cognito, suitable for signed-in users.
 * It takes a CognitoUserSession, a region, and a url, and returns an AuthLink
 * @param {CognitoUserSession} session - The CognitoUserSession object returned from the
 * CognitoUser.getSession() method.
 * @param {string} region - The AWS region where your AppSync API is deployed.
 * @param {string} url - The URL of your GraphQL API.
 */
const createCognitoAuthLink = (session: CognitoUserSession, region: string, url: string) =>
  awsCreateAuthLink({
    auth: {
      jwtToken: session.getIdToken().getJwtToken(),
      type: AUTH_TYPE.AMAZON_COGNITO_USER_POOLS,
    },
    region,
    url,
  });

/* Creating an AuthLink that uses IAM, suitable for non signed-in users. */
export const createIamAuthLink = (region: string, url: string) =>
  awsCreateAuthLink({
    auth: {
      credentials: () => Auth.currentCredentials(),
      type: AUTH_TYPE.AWS_IAM,
    },
    region,
    url,
  });

/**
 * An ApolloLink that uses context to cache the amplifyAuthLink instance.
 * @param {string} region - The AWS region you're using.
 * @param {string} url - The URL of the GraphQL API.
 */
const cachedAmplifyAuthLink = (region: string, url: string) =>
  setContext(() => {
    if (amplifyAuthLink) {
      return { amplifyAuthLink };
    }
    return Auth.currentSession()
      .then((session) => {
        amplifyAuthLink = createCognitoAuthLink(session, region, url);
        return { amplifyAuthLink };
      })
      .catch((error) => {
        amplifyAuthLink = createIamAuthLink(region, url);
        return { amplifyAuthLink };
      });
  });
Amplify API with Unauthenticated role
앞선 Authentication/Authorization에서 Amplify로 만든 Lambda function이 API Gateway로 연결된 경우는 어떻게 될까. 여기서는 Unauthenticated role을 적용한 Cognito identity pool에 사용자가 생성이 되는지 확인 해보았다.
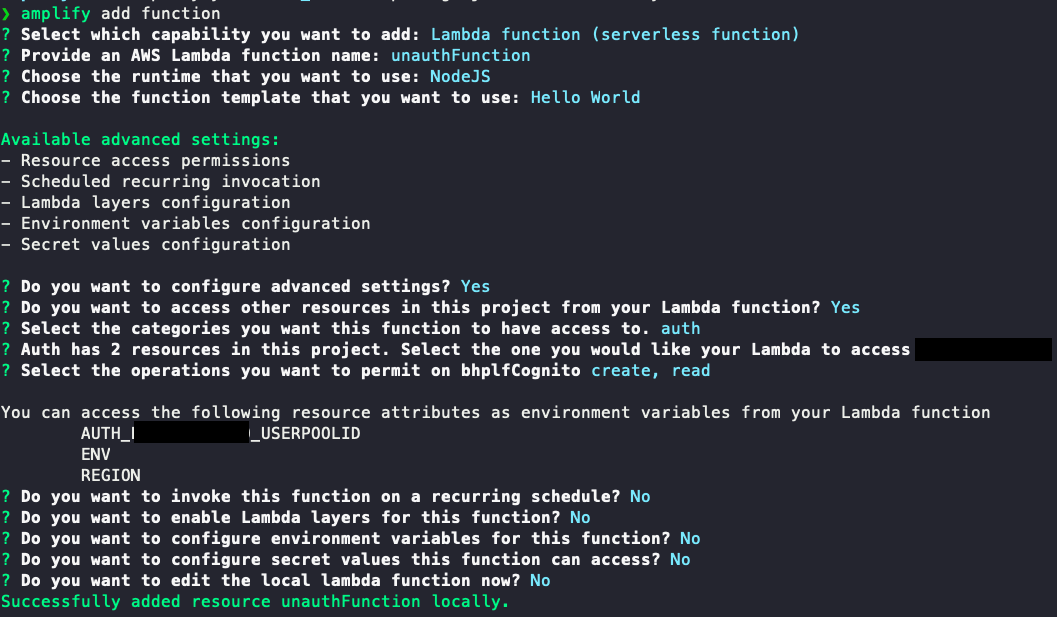
Amplify에서 function을 만들고, API endpoint를 생성한 후, Auth role을 붙여본다.
Lambda 함수 및 API 생성
amplify add function
여기서 TypeScript를 사용하기 위해 Packages들을 설치한다. 앞선 tWIL에서 lib 폴더에서 타입스크립트 프로젝트를 진행하고, src로 build하도록 설정했다. 그리고 Lambda layer에 필요한 dependencies를 설치하고, 신규 Lambda함수는 devDependencies로 설치한다. (용량을 줄이기 위한 편법)
이제 /unauth라는 API Gateway 엔드포인트를 만들고 생성한 Lambda 함수를 연결한다.
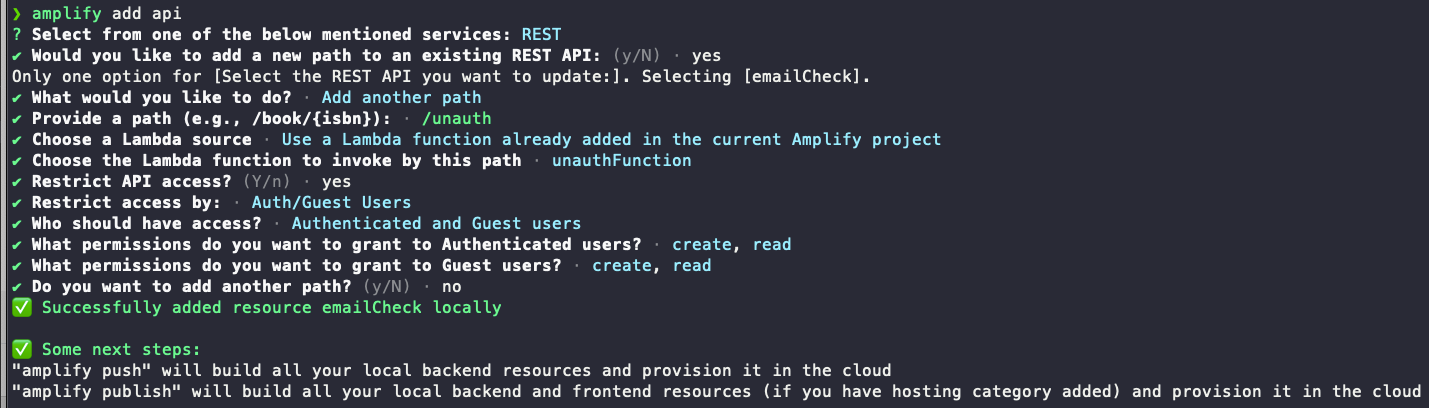
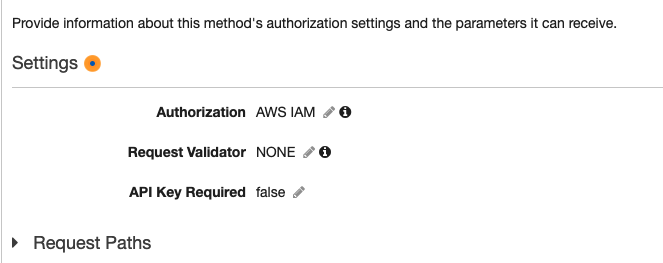
amplify push혹은 CI/CD 설정된 branch로 push하고 API Gateway 콘솔로 가서 배포된 API의 Resource 항목에 Method any를 선택한다. Method Request를 선택하고 Authorization에 AWS IAM으로 수정한다. 참고
- Cognito Identity pool(Federeated identities) 에서 Edit identity pool를 하여,
Unauthenticated role설정에 체크를 해야 한다. - API Gateway에서 Enable CORS 설정을 해야한다.
- API Gateway Response 에서
"Access-Control-Allow-Origin": "*","Access-Control-Allow-Headers": "*"를 해주어야 로컬환경에서 CORB로 컨텐츠가 막히지 않는다. - API Gateway의 Authorizer를 만들어 Cognito user pools를 사용한 경우에도 되지 않는다. 여기서는 Lambda authorizer로 설정해야하는 것 같다.
Client
클라이언트는 RTK를 사용한다고 가정하고, 비인증 로직을 테스트 하기 위해 thunk를 만든다. RTKQ를 쓰지 않고 Amplify의 API를 사용한다. 하루 정도 이 API와 관련하여 삽질을 한 경우가 있어서 정리해본다.
- Header에
"Content-Type": "application/json"이 설정되어야 한다.application/www-urlencoded등 다른 방법을 설정하면403: IncompleteSignatureException에러가 발생한다. - POST method:
POSTmethod를 사용할 때 유의해야할 점이 IAM Signature를 만들 때 Method과 Content-Type또 이 Signature에 포함되기 때문에 정확한 헤더 값이 요구된다. 그리고body를 쓰지 않더라도 API Gateway 인증 룰에서는body데이터 도 포함되어 Signature를 만들기 때문에 비어있더라도 만들어주어야 한다. 이body값을 설정하지 않았다고 계속403: InvalidSignatureException에러를 배출 했었다. - 그래도 오류가 발생하는 경우 Network의 Response에서
x-amzn-errortype을 확인하여 링크참조하여 해결한다.
src/store/features/auth/thunks.ts
import { API } from "aws-amplify";
import { createAsyncThunk } from "@reduxjs/toolkit";

export const unauthCheck = createAsyncThunk("auth/unauthCheck", async () => {
  interface Response {
    unauthCheck: boolean;
  }
  const result = (await API.post("unauth", `/unauth`, {
    headers: {
      "Content-Type": "application/json",
    },
    body: {},
  })) as Response;
  return result;
});
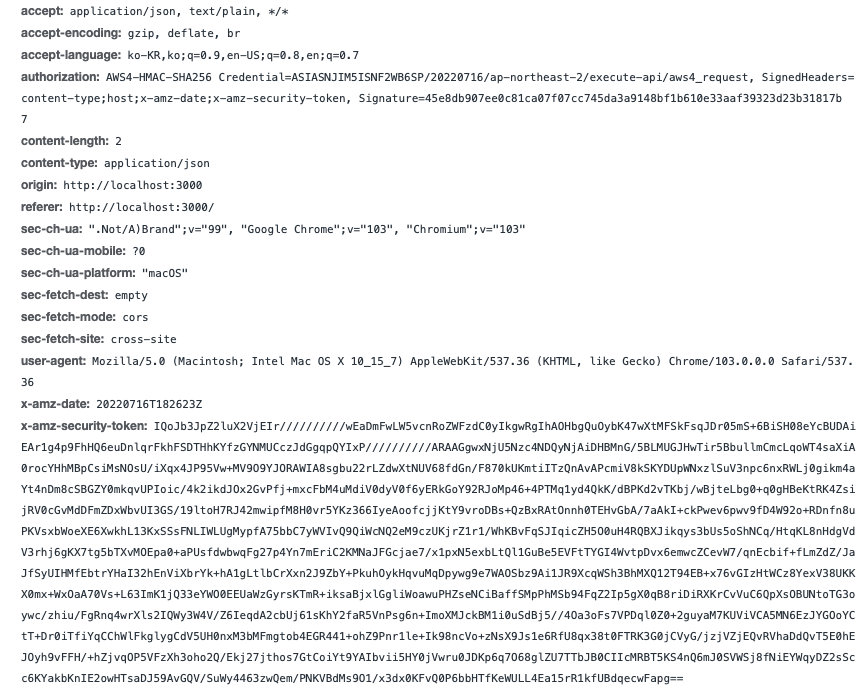
비인가 룰이 적용된 토큰으로 정상적으로 API 요청하는 것을 볼 수 있다.
public으로 요청하게 되는 경우 RTKQ로 테스트를 해보면
src/store/features/api/index.ts
import { createApi, fetchBaseQuery } from "@reduxjs/toolkit/query/react";
import awsExports from "aws-exports";

const {
  aws_cloud_logic_custom: [{ endpoint }],
} = awsExports;

export const apiSlice = createApi({
  reducerPath: "api",
  baseQuery: fetchBaseQuery({
    baseUrl: endpoint,
    prepareHeaders(headers) {
      headers.set("Content-Type", "application/json");
      return headers;
    },
  }),
  endpoints: (builder) => ({
    unauth: builder.mutation({
      query: () => ({
        url: `/unauth`,
        method: "POST",
      }),
    }),
  }),
});

export const { useUnauthMutation } = apiSlice;
일반 API 요청을 하게 되는 경우 401: UnauthorizedException에러가 나오면 정상이다.