- Published on
tWIL 2022.10 4주차
- Authors

- Name
- eunchurn
- @eunchurn
Terraform 으로 AWS Lambda & API Gateway 배포
Terraform이 손에 익으니 이번엔 AWS Lambda와 API Gateway를 배포하고, 도메인을 연결하는 과정도 Terraform으로 셋팅하였다. 이전에는 Serverless 플랫폼을 사용하거나 AWS Amplify로 배포했었다. Serverless 플랫폼의 문제점은 다른 Private 마이크로 서비스와 연동하거나 VPC로 격리된 DB를 사용할 때 발생한다. 콘솔에 가서 연결할 VPC 서브넷을 알아야 하며, Lambda 함수가 적절히 격리되어 있지 않으면 보안에 구멍이 생길 수 있다. Amplify의 문제점은 이전 tWIL에서 충분히 언급해서 이야기할 필요가 없다. TypeScript 환경에서 최악의 Developer Experience를 보여준다.
이번에 배포할 앱은 데모용 앱이라 굳이 이전에 배포한 리포에서 모노 리포로 관리하지 않도록 했다. 따라서 별개로 Terraform 프로젝트를 생성하며 같은 리포에서 함수들을 정의했다. 프로젝트 구조는 다음과 같다.
.
├── jest.config.ts
├── lambda
│   └── src
│       ├── __tests__
│       │   └── index.spec.ts
│       └── index.ts
├── package.json
├── scripts
│   └── build-dependency-layer.sh
├── terraform
│   ├── apiGateway.tf
│   ├── config
│   │   └── terraform.tfvars
│   ├── iam.tf
│   ├── lambda.tf
│   ├── locals.tf
│   ├── outputs.tf
│   ├── provider.tf
│   ├── terraform.tfstate
│   └── variables.tf
├── tsconfig.json
└── yarn.lock
NodeJS TypeScript 프로젝트 설정이며, terraform이라는 폴더에서 인프라를 배포한다. 미션은 아래와 같다.
- Lambda 런타임은 Node 16버전을 사용한다.
- Lambda 함수는 TypeScript로 코딩하며 빌드된 함수를 Lambda로 배포한다.
- Node packages들은 Lambda layer로 배포한다.
- Lambda 함수는 개발자가 원하는 환경변수를 설정하여 적절한 Third party API를 호출한다.
- AWS API Gateway v2로 특정 stage로 엔드포인트를 오픈한다.
- API Gateway 엔드포인트 요청은 CloudWatch로 로깅한다.
- API Gateway는 Route53 특정 zone을 설정하여 도메인을 설정하며, ACM 인증서를 셋팅한다.
Lambda 함수
프로젝트 소스의 위치는 lambda/src로 설정하였다.
import { APIGatewayEvent, APIGatewayProxyResultV2 } from "aws-lambda";
import { getThirdPartyData } from "./thirdparty";
const headers = {
  "Content-Type": "application/json",
  "Access-Control-Allow-Origin": "*",
  "Access-Control-Allow-Headers": "*",
};

export const handler = async (
  event: APIGatewayEvent,
): Promise<APIGatewayProxyResultV2> => {
  console.log("Event: ", event);
  const data = await getThirdPartyData();
  return {
    isBase64Encoded: false,
    statusCode: 200,
    headers,
    body: JSON.stringify(data),
  };
};
Third party API를 호출하는 함수는 생략한다. __tests__/index.spec.ts에서 handler함수에 해당하는 테스트코드를 작성해준다. 이때 thirdparty 함수는 적절히 Mocking해준다.
Lambda Layer 스크립트
script/build-layer.sh 스크립트를 만들어준다.
#!/bin/bash
set -x

ROOT_DIR="$(pwd)"
OUTPUT_DIR="$(pwd)/dist"
LAYER_DIR=$OUTPUT_DIR/layers/nodejs

mkdir -p $LAYER_DIR
cp -LR node_modules $LAYER_DIR
cd $OUTPUT_DIR/layers
zip -r layers.zip nodejs
set -x는 스크립트중 하나라고 실패하면 모두 중단하도록 한다. 스크립트는 단순히 node_modules을 LAYER_DIR로 복사하고 layers.zip파일로 압축한다.
Terraform
모듈을 사용하지 않았다. provider와 resources, data, variables, output들을 맥락에 맞게 소스파일만 분리해 두었다.
provider.tf
provider "aws" {
  profile     = "${var.aws_profile}"
  region      = "${var.aws_region}"
  max_retries = 1
}
variables.tf
variable "aws_region" {
  type    = string
  default = "ap-northeast-2"
}

variable "aws_profile" {
  type    = string
  default = "default"
}

variable "THIRD_PARTY_API_ID" {
  type = string
}

variable "THIRD_PARTY_API_SECRET" {
  type = string
}
outputs.tf
output "api_base_url" {
  value       = aws_apigatewayv2_stage.demo.invoke_url
  description = "The public IP of the API"
}

output "api_domain" {
  value = aws_apigatewayv2_domain_name.demo.domain_name
}

output "function_name" {
  description = "Name of the Lambda function."

  value = aws_lambda_function.lambda.function_name
}
이렇게 프로바이더와 입출력 소스들을 정의하고 Lambda 와 API Gateway를 만들기 전에 IAM Role과 Policy 정의를 위해 iam.tf을 먼저 만든다.
iam.tf
resource "aws_iam_role" "lambda_exec" {
  name = "serverless_lambda"

  assume_role_policy = jsonencode({
    Version = "2012-10-17"
    Statement = [{
      Action = "sts:AssumeRole"
      Effect = "Allow"
      Sid    = ""
      Principal = {
        Service = "lambda.amazonaws.com"
      }
      }
    ]
  })
}

resource "aws_iam_role_policy_attachment" "lambda_policy" {
  role       = aws_iam_role.lambda_exec.name
  policy_arn = "arn:aws:iam::aws:policy/service-role/AWSLambdaBasicExecutionRole"
}
이제 Lambda 인프라를 설정한다. archive_file 모듈로 배포된 위치(dist)를 function.zip으로 압축하고, aws_lambda_layer_version 모듈은 스크립트를 통해 압축한 layers.zip을 업로드한다. aws_lambda_function은 앞서 archive_file 모듈로 압축한 파일을 담도록 설정하고 handler 어트리뷰트에 해당 함수이름 index.handler로 설정한다. 그리고 Lambda에는 Lambda layer를 연결한다. (line 19)
lambda.tf
data "archive_file" "function_archive" {
  type        = "zip"
  source_dir  = "${path.module}/../lambda/dist"
  output_path = "${path.module}/../lambda/dist/function.zip"
}

resource "aws_lambda_layer_version" "dependency_layer" {
  filename            = "${path.module}/../dist/layers/layers.zip"
  layer_name          = "dependency_layer"
  compatible_runtimes = ["nodejs16.x"]
  source_code_hash    = filebase64sha256("${path.module}/../dist/layers/layers.zip")
}

resource "aws_lambda_function" "lambda" {
  filename      = data.archive_file.function_archive.output_path
  function_name = local.name
  role          = aws_iam_role.lambda_exec.arn
  handler = "index.handler"
  layers  = [aws_lambda_layer_version.dependency_layer.arn]

  # Lambda Runtimes can be found here: https://docs.aws.amazon.com/lambda/latest/dg/lambda-runtimes.html
  runtime     = "nodejs16.x"
  timeout     = "30"
  memory_size = local.lambda_memory

  source_code_hash = data.archive_file.function_archive.output_base64sha256

  environment {
    variables = {
      "THIRD_PARTY_API_ID"     = "${var.THIRD_PARTY_API_ID}"
      "THIRD_PARTY_API_SECRET" = "${var.THIRD_PARTY_API_SECRET}"
    }
  }
}
이렇게 Lambda 함수 배포는 설정 완료한다. 이제 API Gateway 엔드포인트에 배포한 Lambda 함수를 연결하면 되겠다. 대부분 aws_apigatewayv2_api, aws_apigatewayv2_stage, aws_apigatewayv2_route, aws_apigatewayv2_integration 참고하면 쉽다. 37번째 라인의 모듈에서 integration_uri를 aws_lambda_function.lambda.invoke_arn로 설정해주면 된다. 예제 문서들을 보면 HTTP Proxy나 Websocket도 SQS에 연결하는 것도 가능하다. API Gateway v2는 Terraform으로 관리하면 꽤 좋을 것 같다. 나중에 API Gateway v2만으로 컨테이너 없이 서비스 하는 예제도 만들어보고 싶다.
apiGateway.tf
resource "aws_cloudwatch_log_group" "demo-api" {
  name = "/aws/lambda/demo-api"

  retention_in_days = 30
}

resource "aws_apigatewayv2_api" "api_gateway_rest_api" {
  name          = "demo-api"
  protocol_type = "HTTP"
}

resource "aws_apigatewayv2_stage" "demo" {
  api_id = aws_apigatewayv2_api.api_gateway_rest_api.id

  name        = "demo"
  auto_deploy = true

  access_log_settings {
    destination_arn = aws_cloudwatch_log_group.demo-api.arn

    format = jsonencode({
      requestId               = "$context.requestId"
      sourceIp                = "$context.identity.sourceIp"
      requestTime             = "$context.requestTime"
      protocol                = "$context.protocol"
      httpMethod              = "$context.httpMethod"
      resourcePath            = "$context.resourcePath"
      routeKey                = "$context.routeKey"
      status                  = "$context.status"
      responseLength          = "$context.responseLength"
      integrationErrorMessage = "$context.integrationErrorMessage"
      }
    )
  }
}

resource "aws_apigatewayv2_integration" "api_gateway_rest_api" {
  api_id = aws_apigatewayv2_api.api_gateway_rest_api.id

  integration_uri    = aws_lambda_function.lambda.invoke_arn
  integration_type   = "AWS_PROXY"
  integration_method = "POST"
}

resource "aws_apigatewayv2_route" "demo-api" {
  api_id = aws_apigatewayv2_api.api_gateway_rest_api.id

  route_key = "GET /forge_token"
  target    = "integrations/${aws_apigatewayv2_integration.api_gateway_rest_api.id}"
}

resource "aws_cloudwatch_log_group" "api_gw" {
  name = "/aws/api_gw/${aws_apigatewayv2_api.api_gateway_rest_api.name}"

  retention_in_days = 30
}

resource "aws_lambda_permission" "api_gw" {
  statement_id  = "AllowExecutionFromAPIGateway"
  action        = "lambda:InvokeFunction"
  function_name = aws_lambda_function.lambda.function_name
  principal     = "apigateway.amazonaws.com"

  source_arn = "${aws_apigatewayv2_api.api_gateway_rest_api.execution_arn}/*/*"
}

resource "aws_apigatewayv2_domain_name" "demo" {
  domain_name = "api.demo.mystack.io"

  domain_name_configuration {
    certificate_arn = aws_acm_certificate.certificate.arn
    endpoint_type   = "REGIONAL"
    security_policy = "TLS_1_2"
  }
}

resource "aws_apigatewayv2_api_mapping" "demo" {
  api_id      = aws_apigatewayv2_api.api_gateway_rest_api.id
  domain_name = aws_apigatewayv2_domain_name.demo.id
  stage       = aws_apigatewayv2_stage.demo.id
}
여기까지 완료해도 API Gateway에서 제공하는 도메인으로 동작이 될 것이다. 하지만 마지막에서 얘기하겠지만, Lambda 함수나 Lambda layer는 Terraform으로 지속적인 배포가 잘 안되었다. 좀 더 찾아봐야겠지만 일단 배포하기 위해 기존 함수들을 지우고 다시 올리는 방식을 취했다. 그래서 API Gateway 도메인도 배포할 때 마다 변경되는데 이를 막기 위해 도메인을 연결해주었다.
route53.tf
data "aws_route53_zone" "platform" {
  name = "mystack.io"
}

resource "aws_route53_zone" "platform_sub_demo" {
  name = "demo.${data.aws_route53_zone.platform.name}"
  depends_on = [
    data.aws_route53_zone.platform
  ]
}

# Sub DNS for Demo

resource "aws_route53_record" "platform_sub-ns" {
  zone_id = data.aws_route53_zone.platform.zone_id
  name    = aws_route53_zone.platform_sub_demo.name
  type    = "NS"
  ttl     = "30"
  records = aws_route53_zone.platform_sub_demo.name_servers

}

resource "aws_route53_record" "demo" {
  for_each = {
    for dvo in aws_acm_certificate.certificate.domain_validation_options : dvo.domain_name => {
      name   = dvo.resource_record_name
      record = dvo.resource_record_value
      type   = dvo.resource_record_type
    }
  }
  allow_overwrite = true
  name            = each.value.name
  records         = [each.value.record]
  ttl             = 60
  type            = each.value.type
  zone_id         = aws_route53_zone.platform_sub_demo.zone_id
}

resource "aws_route53_record" "api_gateway" {
  name    = aws_apigatewayv2_domain_name.demo.domain_name
  type    = "A"
  zone_id = aws_route53_zone.platform_sub_demo.zone_id

  alias {
    name                   = aws_apigatewayv2_domain_name.demo.domain_name_configuration[0].target_domain_name
    zone_id                = aws_apigatewayv2_domain_name.demo.domain_name_configuration[0].hosted_zone_id
    evaluate_target_health = false
  }
}

resource "aws_acm_certificate" "certificate" {
  domain_name               = "api.demo.mystack.io"
  subject_alternative_names = ["demo.mystack.io", "*.demo.mystack.io"]
  validation_method         = "DNS"

  tags = {
    Environment = "demo-api"
  }

  lifecycle {
    create_before_destroy = true
  }
}

resource "aws_acm_certificate_validation" "dns_validation" {
  certificate_arn         = aws_acm_certificate.certificate.arn
  validation_record_fqdns = [for record in aws_route53_record.demo : record.fqdn]
}
이렇게 배포하면 api_base_url로 API Gateway의 도메인이 출력되고, api_domain으로 설정한 도메인 이름이 출력된다. 그리고 function_name Lambda 함수 이름도 출력된다.
Script
이제 완료되었지만, 프로젝트를 빌드하고 Lambda와 Lambda layer 압축을 할 수 있도록 스크립트를 만들어주어야 한다.
{
  "scripts": {
    "lint": "eslint --ext .js,.ts,.tsx ./lambda/src/",
    "script:build-layer": "yarn install --prod; ./scripts/build-layer.sh; yarn install;",
    "build": "tsc",
    "tf:init": "cd terraform; terraform init",
    "tf:plan": "cd terraform; terraform plan -var-file ./config/terraform.tfvars",
    "tf:apply": "yarn build; cd terraform; terraform apply -var-file ./config/terraform.tfvars; yarn cleanup;",
    "tf:destroy": "cd terraform; terraform destroy -var-file ./config/terraform.tfvars",
    "deploy:all": "yarn script:build-layer; yarn tf:apply",
    "update:all": "yarn tf:destroy -auto-approve; yarn deploy:all",
    "cleanup": "rm -rf lambda/dist/*"
  }
}
deploy:all 스크립트를 실행하면, 지속적으로 업데이트한다. update:all은 인프라를 모두 지우고 다시 배포한다.
Wrapping up
나중에 모노 리포로 마이크로 서비스들을 관리하게 되면 CodePipeline을 설정해서 해당 Lambda 함수 리포에서 배포하도록 설정해야한다. 여기는 앞서 말했듯 데모 서비스를 만들고 기존 인프라와 연결할 일이 앞으로도 없을 예정이기 때문에 따로 배포해 보았다. 하나의 서버리스 배포의 use case로 사용할 수 있을 것 같다.
Terraform 으로 React 앱 배포
이번엔 데모앱을 위한 클라이언트 앱을 AWS S3, AWS CloudFront, AWS ACM, AWS Route53 이렇게 4개의 인프라로 React 앱을 배포해 보았다. 이번엔 GitOps를 적용하여 배포하기 위해 CodePipeline과 CodeBuild를 사용하여 배포하였다.
프로젝트 구조는 Create-React-App 으로 생성한 프로젝트(npx create-react-app myapp --template=typescript)이며, 이 프로젝트에 terraform폴더로 인프라를 관리할 수 있는 Terraform 프로젝트를 구성했다. Demo 형태이기 때문에 tfstate는 Remote backend를 사용하지 않았다.
.
├── README.md
├── buildspec.yml
├── package.json
├── public
├── renovate.json
├── src
│   ├── App.test.tsx
│   ├── App.tsx
│   ├── index.tsx
│   ├── logo.svg
│   ├── react-app-env.d.ts
│   ├── reportWebVitals.ts
│   └── setupTests.ts
├── terraform
│   ├── main.tf
│   ├── modules
│   │   ├── front_pipeline
│   │   │   ├── frontend_pipeline
│   │   │   │   ├── codebuild.tf
│   │   │   │   ├── codepipeline.tf
│   │   │   │   ├── iam.tf
│   │   │   │   ├── s3_bucket.tf
│   │   │   │   └── vars.tf
│   │   │   ├── main.tf
│   │   │   └── variables.tf
│   │   └── front_web_app
│   │       ├── frontend
│   │       │   ├── certificate.tf
│   │       │   ├── cloudfront_distribution.tf
│   │       │   ├── iam.tf
│   │       │   ├── s3_bucket.tf
│   │       │   └── vars.tf
│   │       ├── main.tf
│   │       └── variables.tf
│   └── terraform.tfstate
├── tsconfig.json
└── yarn.lock
미션은 다음과 같다.
Front Web App Side
- build한 artifacts를 AWS S3 Bucket으로 업로드 할 수 있도록 버킷을 만든다.
- AWS CloudFront 앱을 생성하고 origin을 S3 버킷으로 설정한다.
- AWS S3 Bucket에 CloudFront의 Access Identity를 연결한다.
- AWS CloudFront에 react-route-dom 이슈 해결을 위해 에러 응답을
/index.html로 설정해준다. us-east-1리전에 만들어진 ACM을 CloudFront 도메인으로 연결한다.
Front Pipeline Side
- Gihub 리포로 CodeStart Connection을 만든다.
- 해당 리포 특정 브랜치를 CodePipeline Source로 설정한다.
- CodeBuild는 프론트 프로젝트에 담긴
buildspec.yml으로 빌드 프로젝트를 수행하도록 한다. buildspec.yml은 postBuild 페이즈에서 S3 버킷으로 업로드 하도록 한다.- CodeBuild 에서 패키지등을 caching하기 위해 Cache 전용 S3 버킷을 생성한다.
이렇게 Front web app의 버킷과 CDN 인프라와 배포 파이프라인을 구성했다. 이렇게 배포해 놓으면 이 후 따로 프론트 앱 관련 인프라를 수정할 일은 없을 것 같다.
Terraform
front_web_app과 front_pipeline을 모듈로 작성하였다.
main.tf
provider "aws" {
  region = "ap-northeast-2"
}

locals {
  application_name = "myapp-demo"
  environment      = "prod"
}

module "front_web_app" {
  source = "./modules/front_web_app"

  application_name        = local.application_name
  environment             = local.environment
  certificate_domain_name = "mystack.io"
  cloudfront_domain_name  = "app.mystack.io"
}

module "front_pipeline" {
  source = "./modules/front_pipeline"

  application_name = local.application_name
  environment      = local.environment
  repository_name  = "my_organization/my_front_app" // Github {organization}/{repository_name}
  branch_name      = "deploy"                       // Deployment branch
}


output "website_cdn_id" {
  value = module.web_app.website_cdn_id
}

output "website_endpoint" {
  value = module.web_app.website_endpoint
}
Front App Side: AWS S3, AWS CloudFront, AWS ACM
이 모듈의 루트는 front_web_app이다.
main.tf
module "static_website_and_cloudfront_distribution" {
  source                  = "./frontend"
  bucket_name             = "${var.application_name}-${var.environment}"
  bucket_acl              = "public-read"
  environment             = var.environment
  certificate_domain_name = var.certificate_domain_name
  cloudfront_domain_name  = var.cloudfront_domain_name
}

output "website_cdn_id" {
  value = module.static_website_and_cloudfront_distribution.website_cdn_id
}

output "website_endpoint" {
  value = module.static_website_and_cloudfront_distribution.website_endpoint
}
frontend/s3.tf
배포할 앱의 dist를 담을 S3 Bucket을 만든다.
resource "aws_s3_bucket" "website_bucket" {
  bucket = var.bucket_name

  tags = {
    Name = var.bucket_name
  }
}

resource "aws_s3_bucket_acl" "website_bucket_acl" {
  bucket = aws_s3_bucket.website_bucket.id
  acl    = var.bucket_acl
}

resource "aws_s3_bucket_website_configuration" "website_config" {
  bucket = aws_s3_bucket.website_bucket.bucket
  index_document {
    suffix = "index.html"
  }
  error_document {
    key = "index.html"
  }
}

resource "aws_s3_bucket_versioning" "website_versioning" {
  bucket = aws_s3_bucket.website_bucket.id
  versioning_configuration {
    status = var.versioning
  }
}

resource "aws_s3_bucket_policy" "website_bucket_policy" {
  bucket = aws_s3_bucket.website_bucket.id

  policy = data.aws_iam_policy_document.s3_bucket_policy.json

}
frontend/cloudfront.tf
403, 404에러를 custom_error_response로 설정해주고, 커스텀 도메인을 연결하려면 viewer_certificate로 ACM 인증서를 설정하고, aliases에 도메인 이름을 설정한다. 나머진 aws_cloudfront_distribution를 참고하면 쉽다.
resource "aws_cloudfront_origin_access_identity" "this" {
  comment = "React App"
}

resource "aws_cloudfront_distribution" "s3_distribution" {
  origin {
    domain_name = aws_s3_bucket.website_bucket.bucket_domain_name
    origin_id   = "website"

    s3_origin_config {
      origin_access_identity = aws_cloudfront_origin_access_identity.this.cloudfront_access_identity_path
    }
  }

  enabled             = true
  default_root_object = "index.html"

  default_cache_behavior {
    allowed_methods  = ["DELETE", "GET", "HEAD", "OPTIONS", "PATCH", "POST", "PUT"]
    cached_methods   = ["GET", "HEAD"]
    target_origin_id = "website"

    forwarded_values {
      query_string = false

      cookies {
        forward = "none"
      }
    }

    viewer_protocol_policy = "redirect-to-https"
    min_ttl                = 0
    default_ttl            = 3600
    max_ttl                = 86400
  }
  custom_error_response {
    error_caching_min_ttl = 3600
    error_code            = 404
    response_code         = 200
    response_page_path    = "/index.html"
  }
  custom_error_response {
    error_caching_min_ttl = 3600
    error_code            = 403
    response_code         = 200
    response_page_path    = "/index.html"
  }
  restrictions {
    geo_restriction {
      restriction_type = "none"
    }
  }

  tags = {
    Name        = "${var.bucket_name}-distribution-${var.environment}"
    Environment = var.environment
  }

  viewer_certificate {
    acm_certificate_arn = data.aws_acm_certificate.certificate.arn
    ssl_support_method  = "sni-only"
    # cloudfront_default_certificate = true
  }
  aliases = [var.cloudfront_domain_name]
}

output "website_cdn_id" {
  value = aws_cloudfront_distribution.s3_distribution.id
}

output "website_endpoint" {
  value = aws_cloudfront_distribution.s3_distribution.domain_name
}
frontend/certificate.tf
이제 보유한 Route53 host zone에 CloudFront의 도메인 레코드를 추가한다. 이때 주의할 점은 CloudFront가 사용하는 인증서는 us-east-1리전에 있어야 한다. 따라서 provider를 추가했다.
provider "aws" {
  alias  = "virginia"
  region = "us-east-1"
}

data "aws_acm_certificate" "certificate" {
  domain = var.certificate_domain_name

  statuses = ["ISSUED"]
  provider = aws.virginia
}

data "aws_route53_zone" "route53_zone" {
  name = var.certificate_domain_name
}

resource "aws_route53_record" "demo_domain" {
  zone_id = data.aws_route53_zone.route53_zone.zone_id
  name    = var.cloudfront_domain_name
  type    = "A"

  alias {
    name                   = aws_cloudfront_distribution.s3_distribution.domain_name
    zone_id                = aws_cloudfront_distribution.s3_distribution.hosted_zone_id
    evaluate_target_health = false
  }
}
frontend/iam.tf
마지막으로 AWS S3 Bucket에 CloudFront의 Access Identity를 연결한다.
data "aws_iam_policy_document" "s3_bucket_policy" {
  statement {
    actions = [
      "s3:GetObject"
    ]
    resources = ["${aws_s3_bucket.website_bucket.arn}/*"]
    principals {
      identifiers = ["*"]
      type        = "AWS"
    }
  }

  statement {
    actions   = ["s3:ListBucket"]
    resources = ["${aws_s3_bucket.website_bucket.arn}"]

    principals {
      type        = "AWS"
      identifiers = ["${aws_cloudfront_origin_access_identity.this.iam_arn}"]
    }
  }
}
여기까지는 S3버킷에 담긴 Front App을 CDN 배포하고 도메인을 연결한 상태다. S3에 빌드된 artifacts가 없으므로 CodePipeline으로 이 버킷에 올려주면 된다.
Front CD/CD Pipeline: AWS CodePipeline, AWS CodeBuild, AWS S3
파이프라인의 루트는 front_pipeline이다.
main.tf
module "frontend_pipeline" {
  source                = "./frontend_pipeline"
  application_name      = var.application_name
  s3_bucket_destination = "${var.application_name}-${var.environment}"
  pipeline_bucket_name  = "${var.application_name}-codepipeline"
  codebuild_bucket_name = "${var.application_name}-codebuild"
  repository_name       = var.repository_name
  branch_name           = var.branch_name
  environment           = var.environment
}
variables.tf
variable "application_name" {
  description = "The name of the application"
  type        = string
}

variable "environment" {
  description = "Applicaiton environment"
  type        = string
}

variable "repository_name" {
  description = "Github Repository full name"
  type        = string
  default     = "eunchurn/terraform-react-s3-cloudfront-pipeline"
}

variable "branch_name" {
  type = string
}
codepipeline.tf
resource "aws_codestarconnections_connection" "github" {
  name          = "github-connection"
  provider_type = "GitHub"
}

resource "aws_codepipeline" "main" {
  name     = "${var.application_name}-frontend-${var.environment}"
  role_arn = aws_iam_role.codepipeline_frontend.arn

  artifact_store {
    location = aws_s3_bucket.pipeline_bucket.bucket
    type     = "S3"
  }

  stage {
    name = "Source"
    action {
      name             = "Source"
      category         = "Source"
      owner            = "AWS"
      provider         = "CodeStarSourceConnection"
      version          = "1"
      output_artifacts = ["SourceArtifact"]

      configuration = {
        ConnectionArn    = "${aws_codestarconnections_connection.github.arn}"
        FullRepositoryId = var.repository_name // "{organization}/{repository}"
        BranchName       = var.branch_name     // "{deploy_branch}"
      }
    }
  }

  stage {
    name = "Build"

    action {
      name             = "Build"
      category         = "Build"
      owner            = "AWS"
      provider         = "CodeBuild"
      input_artifacts  = ["SourceArtifact"]
      output_artifacts = ["BuildArtifact"]
      version          = "1"

      configuration = {
        ProjectName   = aws_codebuild_project.frontend_build_project.arn
        PrimarySource = "SourceArtifact"
      }

      run_order = 2
    }
  }

  tags = {
    Name        = "${var.application_name}-frontend-codepipeline-${var.environment}"
    Environment = var.environment
  }
}
codebuild.tf
특이사항은 CodeBuild 전용 버킷을 만들어 캐싱하도록 하였다. 그리고 Build 이미지에 환경변수 S3_BUCKET_DESTINATION를 추가하여 Build 페이즈에서 S3로 직접 업로드 하도록 한다. 그리고 NodeJS 16을 지원하는 Build 컨테이너는 aws/codebuild/amazonlinux2-x86_64-standard:4.0이다. buildspec.yml에서 쓰일 runtime-versions를 확인해서 CodeBuild 이미지에서 사용가능한 런타임을 확인하자. nodejs 16은 "Amazon Linux 2 x86_64 표준: 4.0", "Ubuntu 표준: 6.0"만 지원한다.
resource "aws_codebuild_project" "frontend_build_project" {
  name          = "${var.application_name}_frontend_${var.environment}"
  description   = "codebuild stage"
  service_role  = aws_iam_role.codebuild_frontend.arn
  build_timeout = var.build_timeout

  artifacts {
    type = "CODEPIPELINE"
  }

  cache {
    type     = "S3"
    location = "${var.codebuild_bucket_name}-${var.environment}/_cache/archives"
  }

  source {
    type      = "CODEPIPELINE"
    buildspec = "./buildspec.yml"
  }

  environment {
    compute_type    = "BUILD_GENERAL1_SMALL"
    image           = var.codebuild_image
    type            = "LINUX_CONTAINER"
    privileged_mode = true

    environment_variable {
      name  = "ENV"
      value = var.environment
    }

    environment_variable {
      name  = "S3_BUCKET_DESTINATION"
      value = var.s3_bucket_destination
    }
  }

  tags = {
    Name        = "${var.application_name}-frontend-codebuild-${var.environment}"
    Environment = var.environment
  }
}
iam.tf
CodePipeline과 CodeBuild에서 사용할 Role과 Policy 설정을 한다.
# IAM role and policy for CodePipeline

resource "aws_iam_role" "codepipeline_frontend" {
  name               = "${var.application_name}-codepipeline-${var.environment}"
  assume_role_policy = data.aws_iam_policy_document.codepipeline.json
}

data "aws_iam_policy_document" "codepipeline" {
  statement {
    effect  = "Allow"
    actions = ["sts:AssumeRole"]

    principals {
      type        = "Service"
      identifiers = ["codepipeline.amazonaws.com"]
    }
  }
}

resource "aws_iam_policy" "codepipeline_frontend" {
  name        = "${var.application_name}-codepipeline-${var.environment}"
  description = "Allow Codepipeline deployments"
  policy      = data.aws_iam_policy_document.codepipeline_frontend.json
}

resource "aws_iam_role_policy_attachment" "codepipeline_frontend" {
  role       = aws_iam_role.codepipeline_frontend.name
  policy_arn = aws_iam_policy.codepipeline_frontend.arn
}

data "aws_iam_policy_document" "codepipeline_frontend" {
  statement {
    effect = "Allow"

    actions = [
      "s3:*"
    ]

    resources = [
      "arn:aws:s3:::*"
    ]
  }

  statement {
    effect = "Allow"

    actions = [
      "codebuild:StartBuild",
      "codebuild:StopBuild",
      "codebuild:BatchGetBuilds"
    ]

    resources = ["*"]
  }

  statement {
    effect = "Allow"

    actions   = ["codestar-connections:UseConnection"]
    resources = ["*"]
  }
}

# IAM role and policy for CodeBuild
resource "aws_iam_role" "codebuild_frontend" {
  name               = "${var.application_name}-codebuild-${var.environment}"
  assume_role_policy = data.aws_iam_policy_document.codebuild.json
}

data "aws_iam_policy_document" "codebuild" {
  statement {
    effect  = "Allow"
    actions = ["sts:AssumeRole"]

    principals {
      type        = "Service"
      identifiers = ["codebuild.amazonaws.com"]
    }
  }
}

resource "aws_iam_policy" "codebuild_frontend" {
  name        = "${var.application_name}-codebuild-${var.environment}"
  description = "Allow codebuild deployments"
  policy      = data.aws_iam_policy_document.codebuild_frontend.json
}

resource "aws_iam_role_policy_attachment" "codebuild_frontend" {
  role       = aws_iam_role.codebuild_frontend.name
  policy_arn = aws_iam_policy.codebuild_frontend.arn
}

data "aws_iam_policy_document" "codebuild_frontend" {
  statement {
    effect = "Allow"

    actions = [
      "logs:CreateLogGroup",
      "logs:CreateLogStream",
      "logs:PutLogEvents",
      "ec2:CreateNetworkInterface",
      "ec2:DescribeDhcpOptions",
      "ec2:DescribeNetworkInterfaces",
      "ec2:DeleteNetworkInterface",
      "ec2:DescribeSubnets",
      "ec2:DescribeSecurityGroups",
      "ec2:DescribeVpcs",
      "ec2:CreateNetworkInterfacePermission"
    ]

    resources = ["arn:aws:logs:ap-northeast-2:*", "arn:aws:ec2:ap-northeast-2:*"]
  }

  statement {
    effect = "Allow"

    actions = [
      "s3:*"
    ]

    resources = [
      "arn:aws:s3:::*"
    ]
  }

  statement {
    effect = "Allow"

    actions = [
      "codebuild:UpdateReportGroup",
      "codebuild:ListReportsForReportGroup",
      "codebuild:CreateReportGroup",
      "codebuild:CreateReport",
      "codebuild:UpdateReport",
      "codebuild:ListReports",
      "codebuild:DeleteReport",
      "codebuild:ListReportGroups",
      "codebuild:BatchPutTestCases"
    ]

    resources = [
      "arn:aws:codebuild:ap-northeast-2:*"
    ]
  }
}
s3_bucket.tf
마지막으로 CodeBuild에서 캐시로 사용할 버킷과 CodePipeline에서 사용할 버킷을 만들어준다.
# S3 bucket used by CodePipeline for artifacts
resource "aws_s3_bucket" "pipeline_bucket" {
  bucket = "${var.pipeline_bucket_name}-${var.environment}"

  tags = {
    Name = "${var.pipeline_bucket_name}-${var.environment}"
  }
}

resource "aws_s3_bucket_acl" "pipeline_bucket_acl" {
  bucket = aws_s3_bucket.pipeline_bucket.id
  acl    = var.bucket_acl
}


# S3 bucket used by CodeBuild for cache
resource "aws_s3_bucket" "codebuild_bucket" {
  bucket = "${var.codebuild_bucket_name}-${var.environment}"

  tags = {
    Name = "${var.codebuild_bucket_name}-${var.environment}"
  }
}

resource "aws_s3_bucket_acl" "codebuild_bucket_acl" {
  bucket = aws_s3_bucket.codebuild_bucket.id
  acl    = var.bucket_acl
}
Wrapping up
이렇게 React App을 배포하는 인프라 구성을 마쳤다. 빠진 부분이 있는데 buildspec.yml에서 마지막에 CloudFront invalidation을 추가해주어야 서울리전이 아닌 전세계 배포를 바로 해준다.
Pipeline이 복잡한데 Github action으로 해도 되지 않냐고 질문할 수도 있겠다. 이전 회사에서 Github action을 메인으로 CI/CD를 구축했었다. Github action을 사용했을 때 문제는 인프라를 콘솔에서 수동으로 만들고 S3 버킷에 직접 빌드된 파일을 보내는 과정에 있다. 그리고 CloudFront invalidation을 시켜주었는데 지금와서 생각해보면 이 버킷이 누가 만들고 관리하는지 그리고 CloudFront 앱 또한 ID값을 Github action에 환경변수로 넣어주는데 관리 지점이 내 머리속 아님 문서일 것이다. 이 프로젝트가 Demo라면 이렇게 만들어진 인프라를 누군가가 지워야할 때가 있을텐데 Github action으로 구성했을 경우 찾아서 지워주어야 한다. IAM Role이나 Policy 만들어진 것도...
이제는 Terraform으로 앱을 배포하고, 이 과정을 모듈화 하여 다른 앱도 쉽게 배포가 가능하다. 그리고 각 앱들의 유니크한 키들을 적어놓고 환경변수로 설정하지 않아도 된다. 어쩔땐 Github action에 설정된 많은 Secrets를 보면 맘이 답답해지긴 하는데 한개도 걸려있지 않은 Secrets 상태를 보니 맘이 편해졌다.
Appendix
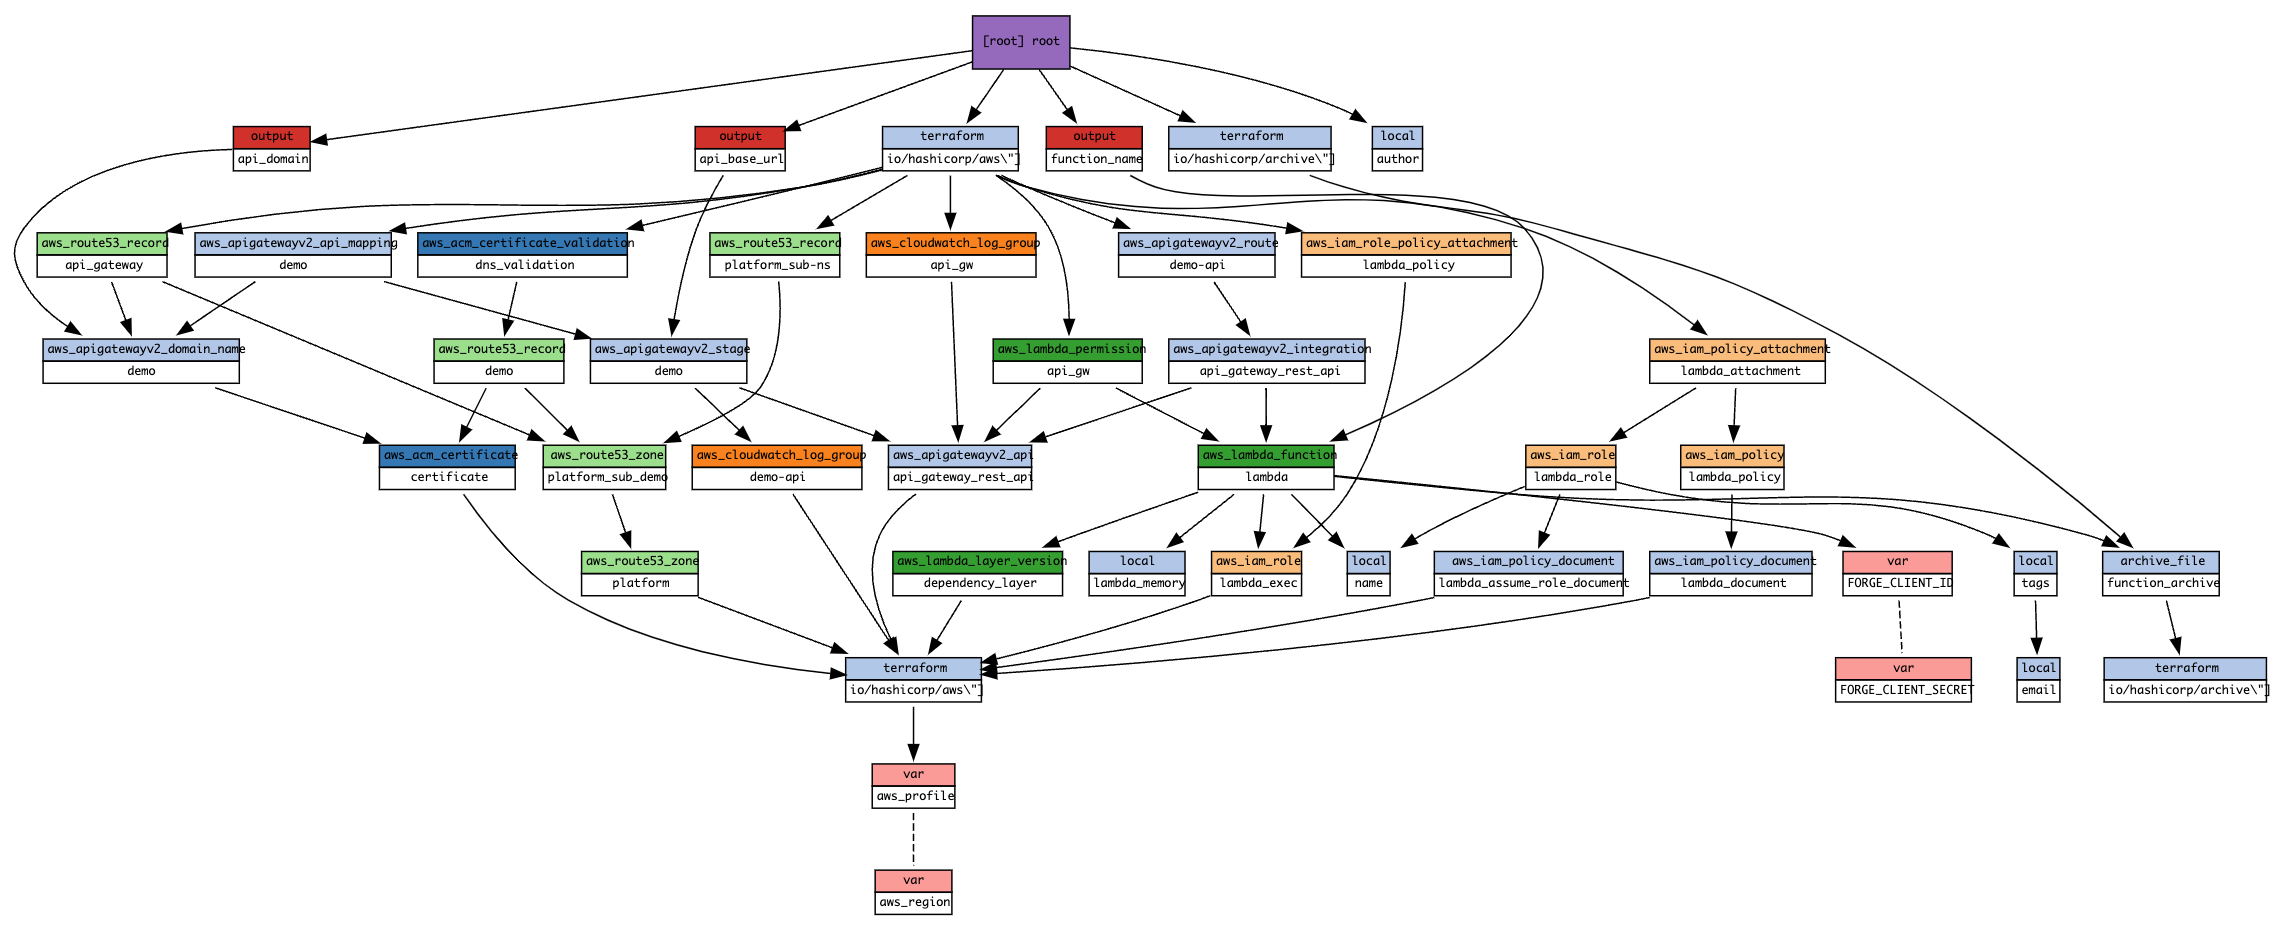
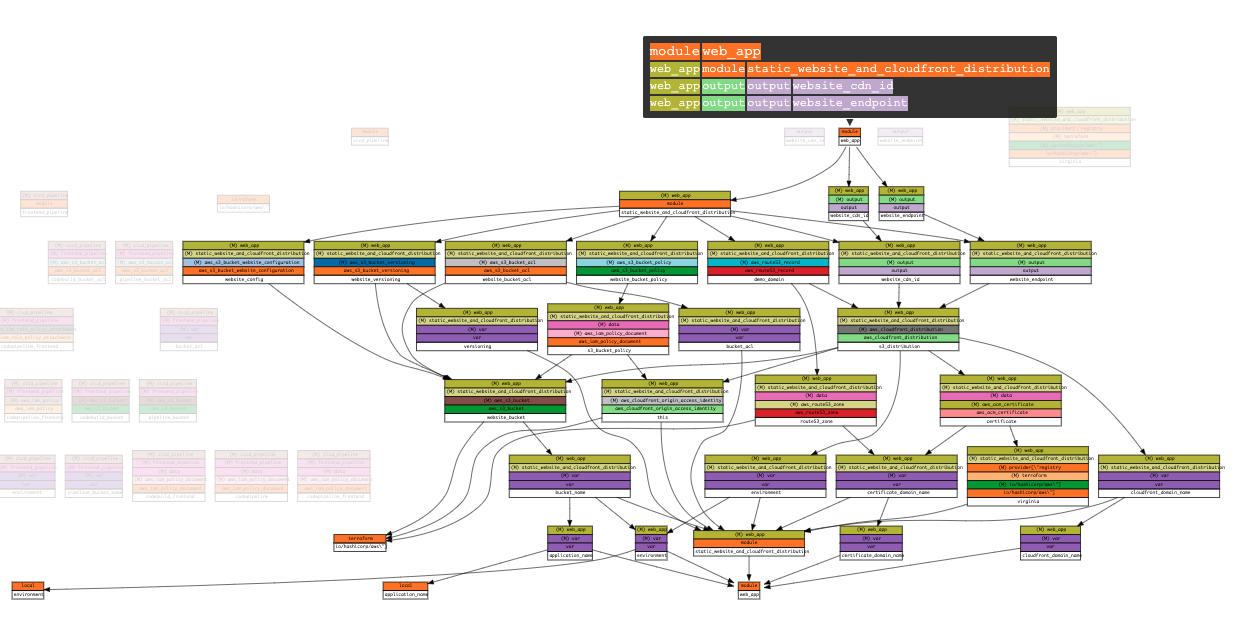
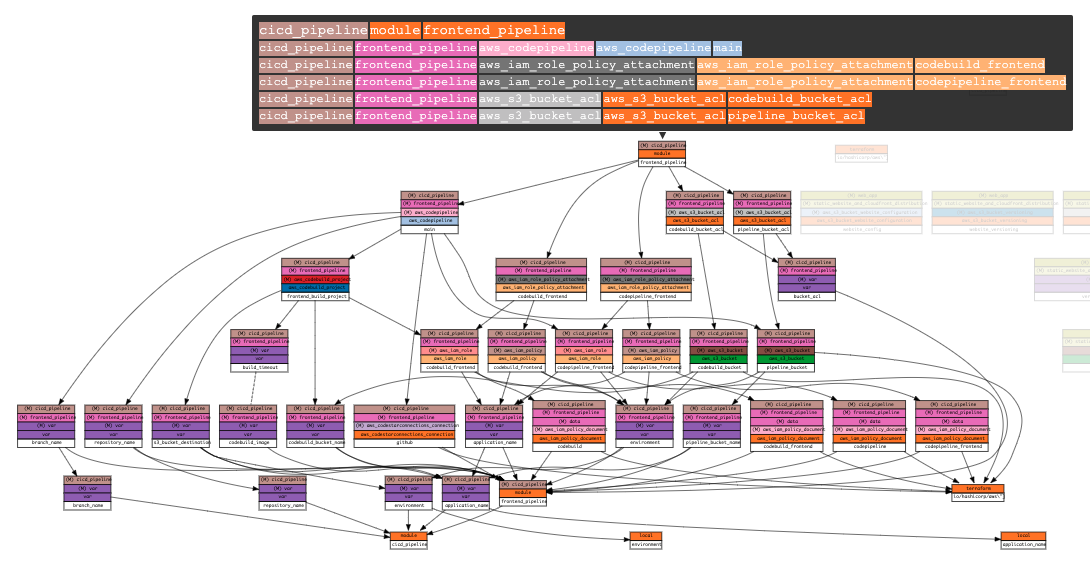
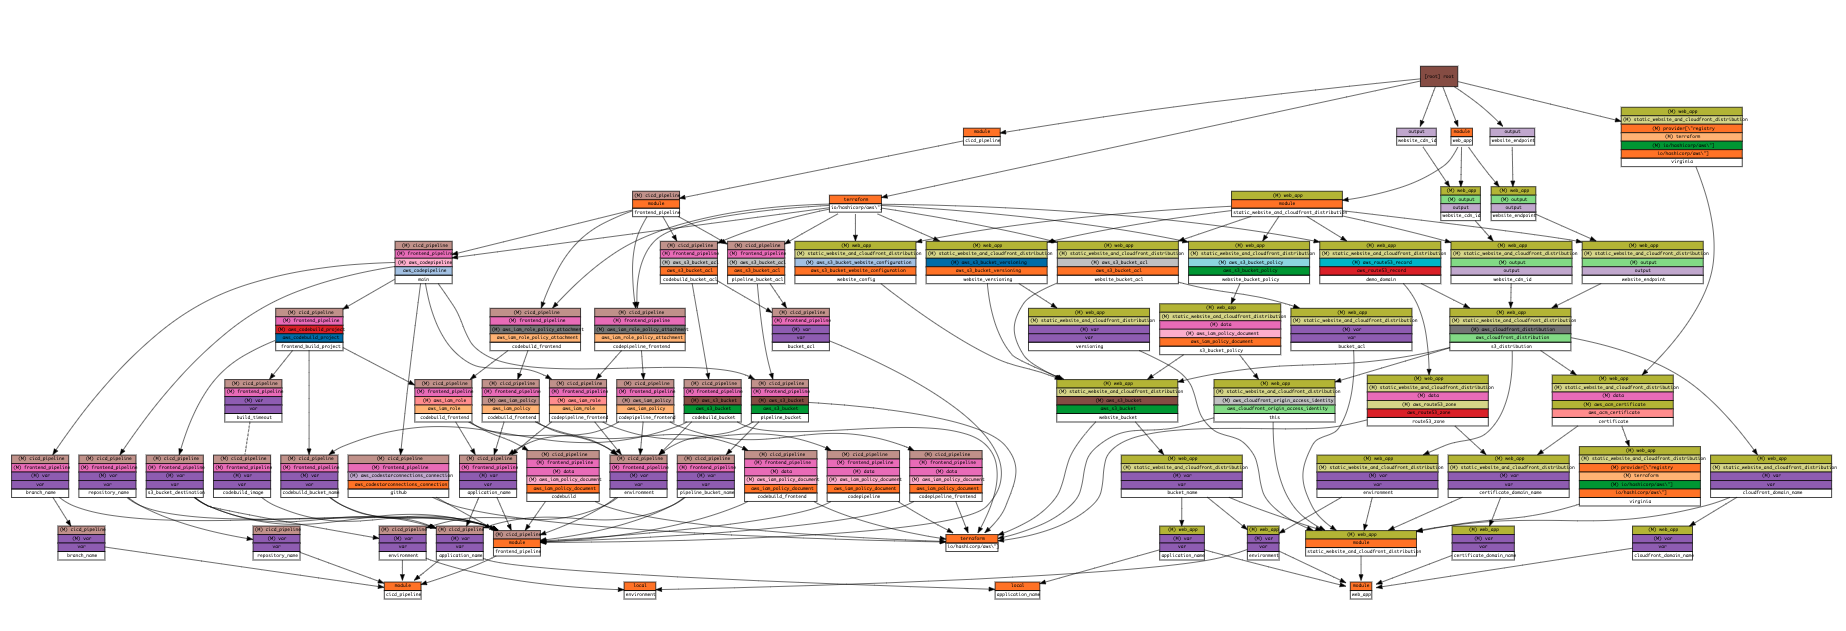
인프라 맵을 보기 위한 Visualizer를 좀 찾아보다가. Pluralith를 써봤는데 좋았지만 문제는 Free 플랜은 프로젝트 1개밖에 설정을 못하는 것이었다. 이런 저런 비주얼라이저를 찾아보다가 Blast radius를 알게되었는데 maintainer가 바쁜 것 같다. 마지막 커밋이 3년전이고 PR 관리도 안되고 있다. 그래서 다른 개발자가 fork해둔 동작해줘서 비주얼라이저를 동작시켰다.
Prerequisite
- Python 3.7 이상
graphiz
Installation
python3 -m pip install git+https://github.com/Ianyliu/blast-radius-fork
Usage
Terraform 프로젝트 루트에서
blast-radius --serve ./terraform