- Published on
tWIL 2022.11 2주차
- Authors

- Name
- eunchurn
- @eunchurn
주말에 코감기로 인해 컨디션이 떨어져서 월요일에 tWIL를 쓰게 되었다. 일주일 정도 보충제 휴약을 했더니 면역체계가 무너진 듯 하다.
기존 Auth 컨테이너를 별개의 ECS Cluster로 구축했었다. 하지만 Auth 컨테이너는 Private subnet에 위치하고 internal load balancer를 붙여야 맞을 것 같다. 그래서 ALB는 API 컨테이너 서비스에 연결하고, Auth 컨테이너를 Private 컨테이너로 재구축을 하였다. 이 블로그 Provisioning Multiple ECS Services Using Terraform를 참고하여 인프라 수정을 진행하였다.
배포했던 SuperTokens 컨테이너는 같은 AWS ECS 클러스터안에 서비스를 분리하였다. SuperTokens이 동작하는 원리는 이미지처럼 API 뒤에서 동작하고 RDB의 Security Group에 있어야 한다.

이러한 방식으로 기존 ECS에 CodeBuild, CodePipeline을 붙여 Terraform을 구성하였다. 추가로 API와 Client를 모두 Terraform의 CodePipeline으로 붙여서 전체 인프라를 한 곳에 모았다.
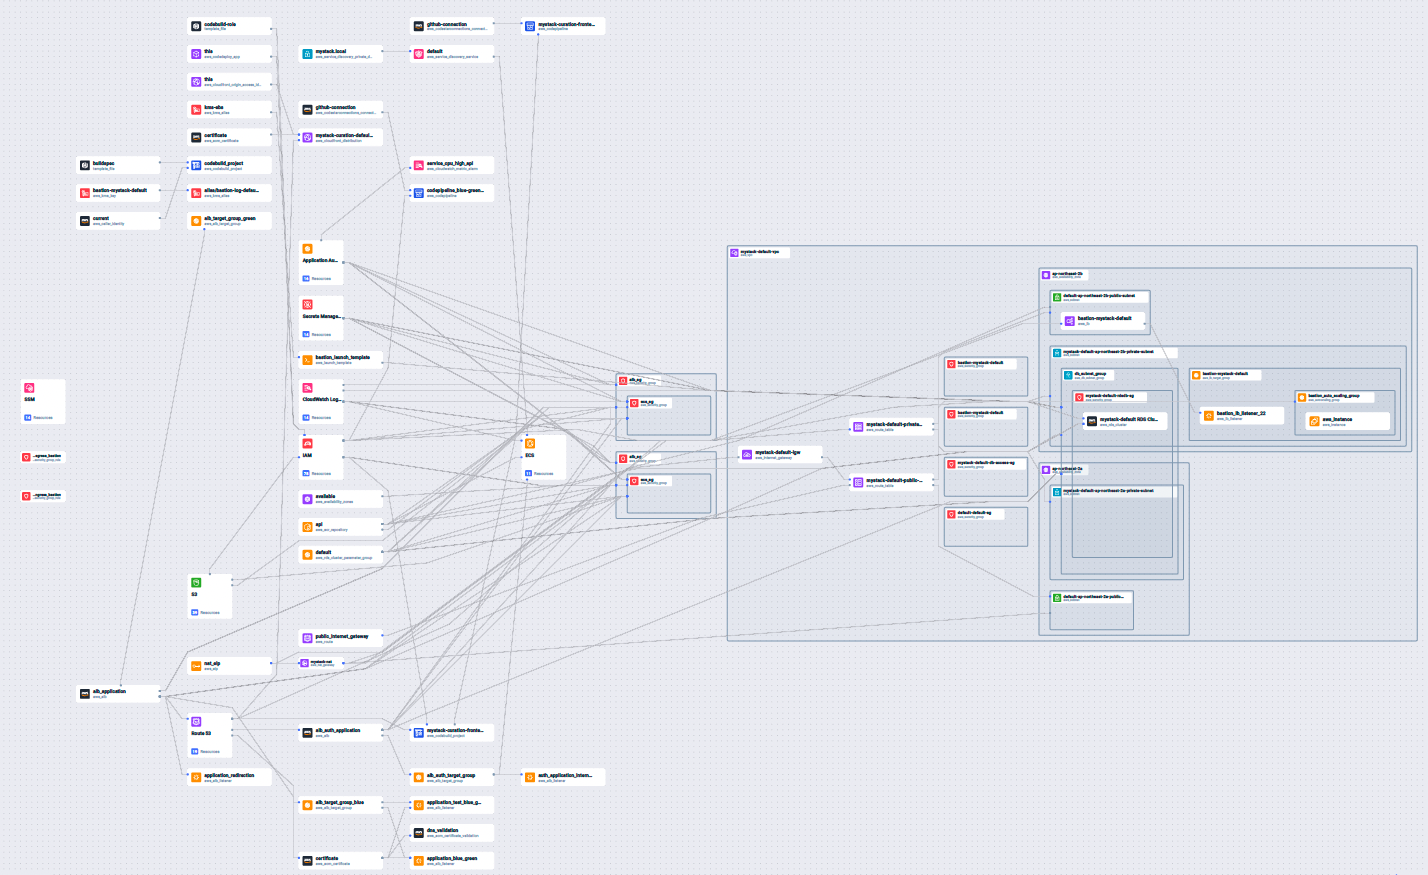
추가된 모듈들은 Bastion, SuperTokens 컨테이너 서비스 그리고 Client WebApp (여기서는 CRA로 빌드하는 React 앱을 사용, Nextjs는 인프라 구성이 좀 다르다.) 주목해야하는 점은 파일 업로드 기능이 있기 때문에 S3 버킷의 주소와 IAM을 별도로 만들어주었다. 그리고 이 액세스 토큰을 API에 설정하고 버킷이름을 기반으로 파일 다운로드를 설정한다.
Bastion
옛 전투에서 성을 지키기 위해 돌출된 부분을 의미한다고 한다. 여기에서는 RDS와 ECS 서비스에 접근하기 위한 일종의 작은 통로라고 생각하고 본다면 AWS EC2에서 키를 하나 발급받아 이름을 지정해 놓는다. 추후 이 키 파일은 백엔드 개발자들만 공유되어야 한다. 그리고 언제든지 이 Bastion은 없애고 새로운 키를 발급받아 새로 Bastion을 생성할 수도 있어야 한다. 여기서는 Best Practice의 모듈을 연결하여 사용하였다. bastion_host_key_pair값을 앞서 발급한 pem키의 이름으로 설정해준다.
module "bastion" {
  source = "./modules/bastion"

  bucket_name                = "bastion-log-${terraform.workspace}-mystack"
  region                     = var.region
  vpc_id                     = module.networks.vpc_id
  is_lb_private              = false
  bastion_host_key_pair      = "bastion"
  create_dns_record          = true
  hosted_zone_id             = module.api.route53_staged_zone.id
  bastion_record_name        = "bastion.${module.api.route53_staged_zone.name}"
  bastion_iam_policy_name    = "bastion-policy-${terraform.workspace}"
  elb_subnets                = [module.networks.public_subnet_1, module.networks.public_subnet_2]
  auto_scaling_group_subnets = [module.networks.private_subnet_1, module.networks.private_subnet_2]
  bucket_force_destroy       = true
  tags = {
    "Name"        = "bastion-${var.application_name}-${terraform.workspace}",
    "description" = "Terraform Bastion server ${var.application_name}-${terraform.workspace}"
  }
}
SuperTokens Services
앞서 API 서비스를 위해 생성한 ECS 클러스터에 서비스를 추가한다.
data "aws_ecs_cluster" "cluster" {
  cluster_name = var.ecs_cluster.name
  depends_on = [
    var.api_cluster_depends_on
  ]
}
여기서 클러스터 ID를 가져와서 붙여준다.
resource "aws_ecs_service" "auth" {
  name                   = local.container_name
  task_definition        = "${aws_ecs_task_definition.supertokens.family}:${max("${aws_ecs_task_definition.supertokens.revision}", "${aws_ecs_task_definition.supertokens.revision}")}"
  desired_count          = 1
  launch_type            = "FARGATE"
  cluster                = data.aws_ecs_cluster.cluster.id
  enable_execute_command = true

  network_configuration {
    security_groups  = flatten(["${var.network.security_groups_ids}", "${module.auth-sg.ecs_security_group.id}"])
    subnets          = flatten(["${var.network.private_subnets_id}"])
    assign_public_ip = true
  }

  propagate_tags          = "TASK_DEFINITION"
  enable_ecs_managed_tags = true

  health_check_grace_period_seconds = 30

  deployment_circuit_breaker {
    enable   = false
    rollback = false
  }

  deployment_controller {
    type = "ECS"
  }

  load_balancer {
    target_group_arn = module.auth-alb.aws_target_group.arn
    container_name   = local.container_name
    container_port   = var.auth_container_port
  }

  tags = {
    Environment = "${terraform.workspace}"
  }

  # 매번 ECS service가 교체되는 이슈 https://github.com/hashicorp/terraform-provider-aws/issues/11526
  lifecycle {
    ignore_changes = [
      cluster,
      iam_role,
      id,
      platform_version
    ]
  }
}
SuperTokens의 Task Definition을 정의한다. Registry 이름은 Running the docker image에서 참고하였다.
resource "aws_ecs_task_definition" "supertokens" {
  family                   = local.container_name
  container_definitions    = <<DEFINITION
  [
    {
      "name": "${local.container_name}",
      "image": "registry.supertokens.io/supertokens/supertokens-postgresql",
      "essential": true,
      "portMappings": [
        {
          "containerPort": 3567,
          "hostPort": 3567
        }
      ],
      "memory": 512,
      "cpu": 256,
      "secrets": [
        {
          "name": "API_KEYS",
          "valueFrom": "/${var.application_name}/${terraform.workspace}/API_SECRET"
        },
        {
          "name": "POSTGRESQL_CONNECTION_URI",
          "valueFrom": "/${var.application_name}/${terraform.workspace}/POSTGRESQL_CONNECTION_URI"
        }
      ],
      "logConfiguration": {
        "logDriver": "awslogs",
        "options": {
          "awslogs-group": "${aws_cloudwatch_log_group.auth_log.name}",
          "awslogs-region": "${var.region}",
          "awslogs-stream-prefix": "ecs"
        }
      }
    }
  ]
  DEFINITION
  requires_compatibilities = ["FARGATE"]
  network_mode             = "awsvpc"
  memory                   = 512
  cpu                      = 256
  execution_role_arn       = module.auth-iam.ecs_execution_role.arn
  task_role_arn            = module.auth-iam.ecs_execution_role.arn
}
그리고 Internal Load balancer를 붙여 준다.
resource "aws_alb" "alb_auth_application" {
  name            = "${var.application_name}-auth-${terraform.workspace}-${var.random_id_prefix}-alb"
  internal        = true
  subnets         = flatten(["${var.private_subnet_ids}"])
  security_groups = flatten(["${var.security_groups_ids}", "${var.ecs_security_group.id}", "${var.alb_security_group.id}"])
  lifecycle {
    create_before_destroy = true
  }
  tags = {
    Name        = "${var.application_name}-auth-${terraform.workspace}-${var.random_id_prefix}-alb"
    Environment = "${terraform.workspace}"
  }
}
로드밸런서와 보안그룹을 만들고 RDS 보안그룹과 API보안그룹에 붙여주면, SuperTokens는 인터널로 접속 가능상태로 배포가 된다. Bastion 서버로 접속하여
curl auth.platform.mystack.io/hello
로 단순하게 health check가 가능하다.
Client Web App
지난번 React 프로젝트만 배포하는 Terraform 코드에 모듈화만 한단계 추가한다. React는 S3에 배포하고 CloudFront에서 CDN 배포한다. React 특히 CRA에서 환경변수는 런타임이 아니라 빌드타임에 설정된다는 것을 감안하면, CodeBuild에 필요한 환경변수를 설정한다. 알다 시피 앱에서 사용할 환경변수는 REACT_APP 프리픽스가 되어있어야 한다.
resource "aws_codebuild_project" "frontend_build_project" {
  name          = "${var.application_name}_frontend_${var.environment}"
  description   = "codebuild stage"
  service_role  = aws_iam_role.codebuild_frontend.arn
  build_timeout = var.build_timeout

  artifacts {
    type = "CODEPIPELINE"
  }

  cache {
    type     = "S3"
    location = "${var.codebuild_bucket_name}-${var.environment}/_cache/archives"
  }

  source {
    type      = "CODEPIPELINE"
    buildspec = "./buildspec.yml"
  }

  environment {
    compute_type    = "BUILD_GENERAL1_SMALL"
    image           = var.codebuild_image
    type            = "LINUX_CONTAINER"
    privileged_mode = true

    environment_variable {
      name  = "ENV"
      value = var.environment
    }

    environment_variable {
      name  = "S3_BUCKET_DESTINATION"
      value = var.s3_bucket_destination
    }
    environment_variable {
      name  = "DISTRIBUTION_ID"
      value = var.cloudfront_distrubution_id
    }
    environment_variable {
      name  = "APOLLO_KEY"
      value = var.ssm_parameters.APOLLO_KEY
    }
    environment_variable {
      name  = "REACT_APP_API_URL"
      value = "https://${var.api_endpoint}"
    }
    environment_variable {
      name  = "REACT_APP_HOST_URL"
      value = "https://${var.website_endpoint}"
    }
    environment_variable {
      name  = "REACT_APP_KAKAO_KEY"
      value = var.ssm_parameters.KAKAO_KEY
    }
    environment_variable {
      name  = "REACT_APP_S3_BUCKET_ID"
      value = var.client_s3_bucket_id
    }
  }

  tags = {
    Name        = "${var.application_name}-frontend-codebuild-${var.environment}"
    Environment = var.environment
  }
}
완성본
Terraform ECS Multiple Fargate APIs(Prisma GraphQL API, SuperTokens) Blue-Green Deployment
앱 테스터
API와 SuperTokens 그리고 클라이언트 앱까지 모두 풀스택으로 동작시키려면 API와 웹앱을 만들어야한다.
API
지난 tWIL에서 만든 API를 사용하자. 단 authdb는 SuperTokens 전용으로 스키마를 변경한다. 로컬 테스트용 docker-compose 환경변수는 아래와 같이 변경한다.
DATABASE_URL=postgresql://postgres:password@localhost:5432/apidb?schema=public&connection_limit=5
POSTGRESQL_HOST=postgresqldb
POSTGRESQL_PORT=5432
POSTGRESQL_DATABASE_NAME=authdb
POSTGRESQL_USER=postgres
POSTGRESQL_PASSWORD=password
API_SECRET=m6ailW4fGbCjU25KpJsyM1jWSEJjlZAV
APOLLO_GRAPH_REF=mystack-api@current
AUTH_DOMAIN=http://localhost:3567
API_DOMAIN=http://localhost:8000
WEB_DOMAIN=http://localhost:3000
지난번 Prisma db pull을 통해 같은 DB에 SuperTokens의 DB를 위치했는데 아무래도 여기 테이블은 건들지 않는 편이 좋겠다고 판단하여 별개로 분리했다. apidb와 authdb로 그리고 override 옵션을 통해 originalImplementation에 post hook을 걸어 데이터 동기화를 시켜주기로 한다.
그리고 Recipe는 추후 소셜로그인을 허용하기 위해 ThirdParyEmailPassword 레시피를 사용하였다.
마지막 고민은 개발자를 위한 Apollo Studio였다. SuperTokens는 세션 인증으로 사용자를 판별하기 때문에 Apollo Studio는 다른 도메인이기 때문에 쿠키 공유가 안된다. 이건 어쩔 수 없이 방치해놓고 안되면 서버에 Playground를 뛰우는 방식으로 수정할지 고민했었다. 우리의 GraphQL은 기존에 Authorization Bearer 토큰으로 사용자가 누구인지를 알고 해당 사용자에 적합한 데이터를 건네주었다. 따라서 Variables에 사용자의 ID를 담는일은 없었다. Session 방식으로도 충분히 가능했다. 그렇지만 개발 환경이 만들어지지 않는다는 고민은 부채로 남겨두었었는데 apollo explorer의 Embedded Explorer를 발견하였다.
너무 나이스한 타이밍에 이것이 나온게 아닌가 싶을 정도로 맞아 떨어졌다.
즉 Apollo Studio를 우리의 웹앱에 추가할 수 있었다. 웹앱을 스튜디오로 인증만 해주면 개발계정이 있는 사람들은 웹앱에서 세션을 공유하며 요청처리를 할 수 있다. 실제로 테스트를 해봤으며 성공. Embedding on an arbitrary webpage
하나의 컴포넌트로 원하는 위치에 띄울 수 있다. Embedded 컴포넌트이기 때문에 Styled-Component로 하위 스타일도 수정이 가능하다. 전에 굳이 복잡하게 사용하던 Apollo Client도 간단해지고 심지어 GraphQL-Request도 간단히 보낼 수 있으며, REST 호출까지 보안이슈 없이 사용이 가능해졌다. 예시로, 어드민 페이지에 달아서 필요할 때 개발자들이 해당사용자로 로그인하고 쿼리를 보내고 데이터를 확인하면 된다. 예전처럼 API로 로그인하고 Authorization을 헤더에 셋팅하고 쿼리를 보내다가 다른 사용자의 데이터를 보기 위해 토큰을 지우고 새로 로그인하여 헤더를 셋팅하는 이런 작업을 반복할 필요가 없어졌다.
Apollo Server v4
그리고 새로운 GA Apollo Server가 출시되었다. v4에서는 Express도 포함되었다. 따라서 apollo-server-express를 더이상 사용할 필요가 없어졌다.
Migration 가이드를 통해 v3에서 v4로 코드를 모두 변경한다.
import { ApolloServer } from "apollo-server-express";
import { ApolloServer } from "@apollo/server";
import { expressMiddleware } from "@apollo/server/express4";
import { ApolloServerPluginDrainHttpServer } from "@apollo/server/plugin/drainHttpServer";
import http from "http";
최종 서버의 코드는
import { ApolloServer } from "@apollo/server";
import http from "http";
import { expressMiddleware } from "@apollo/server/express4";
import { ApolloServerPluginDrainHttpServer } from "@apollo/server/plugin/drainHttpServer";
import { ApolloServerPluginLandingPageProductionDefault } from "@apollo/server/plugin/landingPage/default";
import { getApp } from "./libs";
import { schema } from "./schema";
import { context, Context } from "./context";

const port = process.env.PORT || "8000";

function getPlugins(httpServer: http.Server) {
  const plugins = [ApolloServerPluginDrainHttpServer({ httpServer })];
  plugins.push(
    ApolloServerPluginLandingPageProductionDefault({
      graphRef: process.env.APOLLO_GRAPH_REF,
      footer: false,
      embed: true,
    }),
  );
  return plugins;
}

export async function runServer() {
  const app = await getApp();
  const httpServer = http.createServer(app);
  const plugins = getPlugins(httpServer);
  const server = new ApolloServer<Context>({
    schema,
    introspection: process.env.NODE_ENV !== "production",
    plugins,
    csrfPrevention: true,
  });
  await server.start();
  app.use("/", expressMiddleware(server, { context }));
  await new Promise<void>((resolve) =>
    httpServer.listen({ port: Number(port) }, resolve),
  );
  console.info(`🚀 GraphQL service ready at http://localhost:${port}`);
}
이렇게 셋팅한 API 소스 코드는 API Repository 커밋을 참고
Client WebApp (Headless)
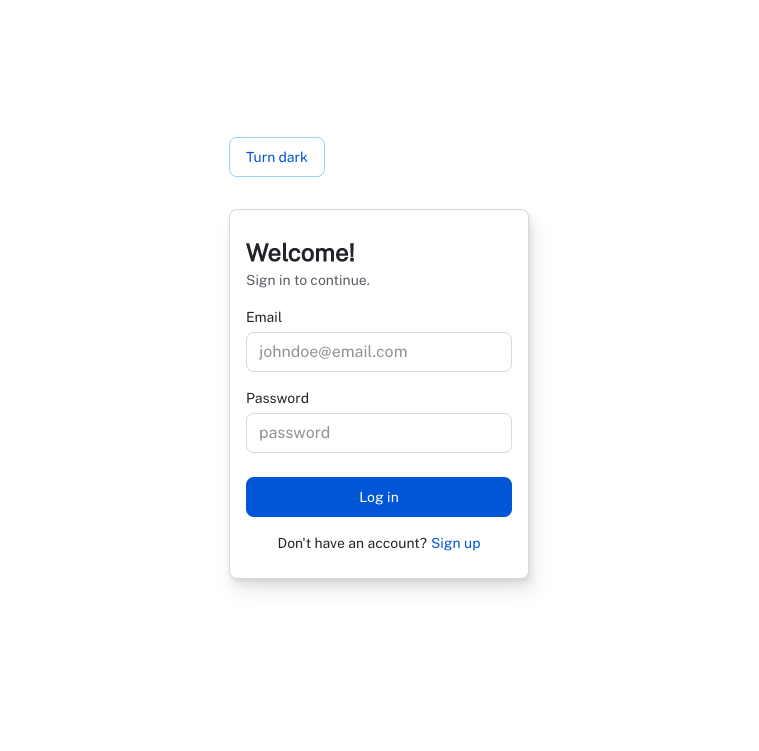
여기서 Headless는 SuperTokens가 제공하는 DefaultUI를 사용하지 않는 방식으로 이름을 붙였다. Material UI의 Joy UI를 사용해보자. 따라하기 예제로 로그인폼을 만든다.
- SignIn
import * as React from "react";
import { useColorScheme } from "@mui/joy/styles";
import Sheet from "@mui/joy/Sheet";
import { Box } from "@mui/joy";
import Typography from "@mui/joy/Typography";
import TextField from "@mui/joy/TextField";
import Button from "@mui/joy/Button";
import Link from "@mui/joy/Link";
import { useNavigate } from "react-router-dom";
import { emailPasswordSignIn } from "supertokens-web-js/recipe/thirdpartyemailpassword";
function ModeToggle() {
const { mode, setMode } = useColorScheme();
const [mounted, setMounted] = React.useState(false);
// necessary for server-side rendering
// because mode is undefined on the server
React.useEffect(() => {
setMounted(true);
}, []);
if (!mounted) {
return null;
}
return (
<Button
variant="outlined"
onClick={() => {
setMode(mode === "light" ? "dark" : "light");
}}
>
{mode === "light" ? "Turn dark" : "Turn light"}
</Button>
);
}
interface State {
email: string;
password: string;
}
const initState: State = {
email: "",
password: "",
};
export function Signin() {
const [state, setState] = React.useState<State>(initState);
const navigate = useNavigate();
const handleChange = (e: React.ChangeEvent<HTMLInputElement>) => {
setState({ ...state, [e.target.name]: e.target.value });
};
const signIn = React.useCallback(() => {
emailPasswordSignIn({
formFields: [
{ id: "email", value: state.email },
{ id: "password", value: state.password },
],
}).then(() => navigate("/"));
}, [navigate, state.email, state.password]);
return (
<Box
sx={{
width: "100vw",
height: "95vh",
display: "flex",
justifyContent: "center",
alignItems: "center",
}}
>
<main style={{ maxWidth: "600px" }}>
<ModeToggle />
<Sheet
sx={{
width: 300,
mx: "auto", // margin left & right
my: 4, // margin top & botom
py: 3, // padding top & bottom
px: 2, // padding left & right
display: "flex",
flexDirection: "column",
gap: 2,
borderRadius: "sm",
boxShadow: "md",
}}
variant="outlined"
>
<div>
<Typography level="h4" component="h1">
<b>Welcome!</b>
</Typography>
<Typography level="body2">Sign in to continue.</Typography>
</div>
<TextField
// html input attribute
name="email"
type="email"
placeholder="johndoe@email.com"
// pass down to FormLabel as children
label="Email"
onChange={handleChange}
/>
<TextField
name="password"
type="password"
placeholder="password"
label="Password"
onChange={handleChange}
/>
<Button sx={{ mt: 1 /* margin top */ }} onClick={signIn}>
Log in
</Button>
<Typography
endDecorator={<Link href="/signup">Sign up</Link>}
fontSize="sm"
sx={{ alignSelf: "center" }}
>
Don't have an account?
</Typography>
</Sheet>
</main>
</Box>
);
}
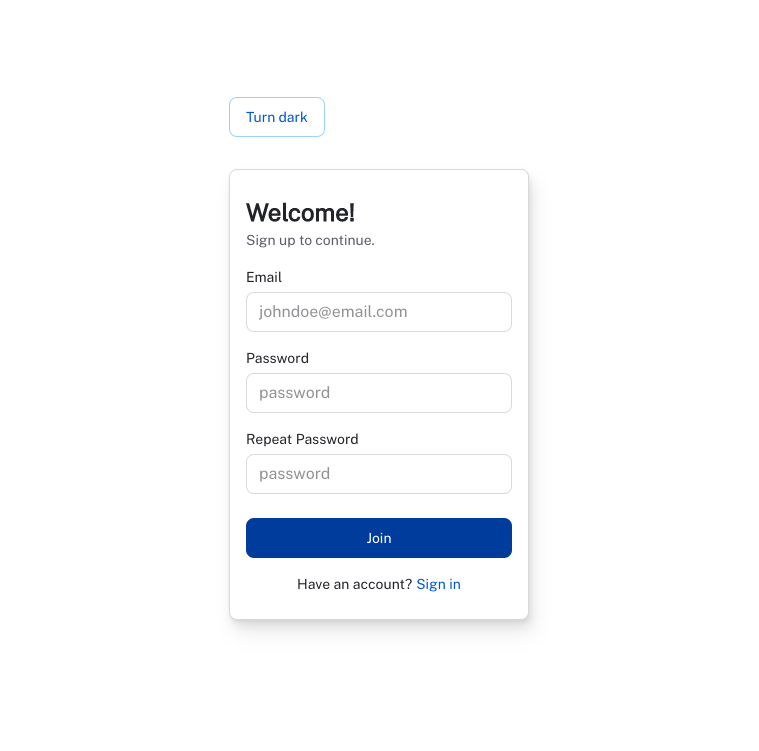
- SignUp
회원가입폼도 간단히 수정하여 만든다.
import * as React from "react";
import { useColorScheme } from "@mui/joy/styles";
import Sheet from "@mui/joy/Sheet";
import { Box } from "@mui/joy";
import Typography from "@mui/joy/Typography";
import TextField from "@mui/joy/TextField";
import Button from "@mui/joy/Button";
import Link from "@mui/joy/Link";
import { useNavigate } from "react-router-dom";
import { emailPasswordSignUp } from "supertokens-web-js/recipe/thirdpartyemailpassword";

function ModeToggle() {
  const { mode, setMode } = useColorScheme();
  const [mounted, setMounted] = React.useState(false);
  // necessary for server-side rendering
  // because mode is undefined on the server
  React.useEffect(() => {
    setMounted(true);
  }, []);
  if (!mounted) {
    return null;
  }

  return (
    <Button
      variant="outlined"
      onClick={() => {
        setMode(mode === "light" ? "dark" : "light");
      }}
    >
      {mode === "light" ? "Turn dark" : "Turn light"}
    </Button>
  );
}

interface State {
  email: string;
  password: string;
  newPassword: string;
}

const initState: State = {
  email: "",
  password: "",
  newPassword: "",
};

export function Signup() {
  const [state, setState] = React.useState<State>(initState);
  const navigate = useNavigate();
  const handleChange = (e: React.ChangeEvent<HTMLInputElement>) => {
    setState({ ...state, [e.target.name]: e.target.value });
  };
  const signUp = React.useCallback(() => {
    emailPasswordSignUp({
      formFields: [
        { id: "email", value: state.email },
        { id: "password", value: state.password },
      ],
    }).then(() => {
      navigate("/");
    });
  }, [navigate, state.email, state.password]);
  return (
    <Box
      sx={{
        width: "100vw",
        height: "95vh",
        display: "flex",
        justifyContent: "center",
        alignItems: "center",
      }}
    >
      <main style={{ maxWidth: "600px" }}>
        <ModeToggle />
        <Sheet
          sx={{
            width: 300,
            mx: "auto", // margin left & right
            my: 4, // margin top & botom
            py: 3, // padding top & bottom
            px: 2, // padding left & right
            display: "flex",
            flexDirection: "column",
            gap: 2,
            borderRadius: "sm",
            boxShadow: "md",
          }}
          variant="outlined"
        >
          <div>
            <Typography level="h4" component="h1">
              <b>Welcome!</b>
            </Typography>
            <Typography level="body2">Sign up to continue.</Typography>
          </div>
          <TextField
            // html input attribute
            name="email"
            type="email"
            placeholder="johndoe@email.com"
            // pass down to FormLabel as children
            label="Email"
            onChange={handleChange}
          />
          <TextField
            name="password"
            type="password"
            placeholder="password"
            label="Password"
            onChange={handleChange}
          />
          <TextField
            name="newPassword"
            type="password"
            placeholder="password"
            label="Repeat Password"
            onChange={handleChange}
          />
          <Button
            sx={{ mt: 1 /* margin top */ }}
            disabled={state.newPassword !== state.password}
            onClick={signUp}
          >
            Join
          </Button>
          <Typography
            endDecorator={<Link href="/signin">Sign in</Link>}
            fontSize="sm"
            sx={{ alignSelf: "center" }}
          >
            Have an account?
          </Typography>
        </Sheet>
      </main>
    </Box>
  );
}
- 로그인 성공

Apollo Server는 Context의 Session을 통해 사용자의 ID를 가져와서 필요한 쿼리들을 만들어내면 된다. 당연히 지난 tWIL에서 적었던 Override함수들이 동작해야한다. PreHook, PostHook 모두 개발자가 원하는 입맛으로 수정할 수 있다.
supertokens.init({
  recipeList: [
    ThirdParyEmailPassword.init({
      providers: [
        // ...omitted
      ],
      override: {
        functions: (originalImplementation) => {
          return {
            ...originalImplementation,
            async emailPasswordSignIn(input) {
              const signinUser =
                await originalImplementation.emailPasswordSignIn(input);
              const { status } = signinUser;
              if (status === "OK") {
                const {
                  user: { email, id },
                } = signinUser;
                await prisma.accessLog.create({
                  data: {
                    user: { connect: { authId: id } },
                    email,
                    accessType: AccessType.SIGNIN,
                  },
                });
              }
              return signinUser;
            },
            async emailPasswordSignUp(input) {
              const signupUser =
                await originalImplementation.emailPasswordSignUp(input);
              const { status } = signupUser;
              if (status === "OK") {
                const {
                  user: { email, id },
                } = signupUser;
                await prisma.user.create({ data: { email, authId: id } });
                await prisma.accessLog.create({
                  data: {
                    user: { connect: { authId: id } },
                    email,
                    accessType: AccessType.SIGNUP,
                  },
                });
              }

              return signupUser;
            },
          };
        },
      },
    })
  ]
})
나중에 리팩토링 할 때 별도의 hook 함수를 만들어 테스트 코드와 함께 붙여야 한다. 현재는 동작하는 대로 그대로 두고 클라이언트 작업에 열을 올려햐 한다.
Terraform으로 API와 Auth ECS 클러스터에 서비스로 배포하고 Client를 CDN에 배포하고 테스트해보면 된다. 개인 AWS 계정을 가지고 있다면 테스트 해보면 될 것 같다. 이제서야 Cognito 지옥에서 해방이 된 것 같다.
Apollo Explorer
아폴로 Explorer를 설치해보자 use-deep-compare-effect가 peerDeps에 추가되지 않은 것 같다. 같이 설치한다.
yarn add @apollo/explorer use-deep-compare-effect
Route에 이 컴포넌트를 추가하면
import { EmbeddedExplorer } from "./Explorer";

function App() {
  return (
    <RootProvider>
      <CssBaseline />
      <Routes>
        <Route path="/" element={<Home />} />
        <Route path="signin" element={<Signin />} />
        <Route path="signup/*" element={<Signup />} />
        <Route path="explorer/*" element={<EmbeddedExplorer />} />
      </Routes>
    </RootProvider>
  );
}
그리고 ApolloExplorer는 height가 이상하게 설정되어 있어서 styled로 전체로 확장시켜준다.
import { ApolloExplorer } from "@apollo/explorer/react";
import { styled } from "@mui/joy";

const StyledApolloExplorer = styled(ApolloExplorer)(() => ({
  width: "100%",
  height: "100vh",
  overflowY: "hidden",
}));

export function EmbeddedExplorer() {
  return (
    <StyledApolloExplorer
      graphRef="builderhub-api@current"
      persistExplorerState
      includeCookies
      initialState={{
        document: `query ExampleQuery {
  getMe {
    authId
  }
}
`,
        variables: {},
        headers: {},
        displayOptions: {
          showHeadersAndEnvVars: true,
          docsPanelState: "open",
          theme: "light",
        },
      }}
    />
  );
}
http://localhost:3000/explorer에 접속하면 최초 Apollo Studio에 인증처리 해주면 Apollo Exporer가 뜨고 getMe 쿼리 요청은 정상.

그리고 세션은 쿠키에 그대로 담겨있는 것을 볼 수 있다.

Client 앱 전체 소스 코드는 Client WebAPP Repository 여기에 공개한다.
다음 주는 ThirdParty 소셜 회원가입 로그인을 구현해보고 Admin 까지 적용하려고 한다. 그리고 속도를 붙여 나머지 미뤄두었던 이메일 찾기, 비밀번호 찾기 모두 구현할 예정이다.
그리고 SuperTokens는 DB Statefull 세션이기 때문에 Prisma Schema의 User만 동기화 라는 마이크로서비스를 만든다면 괜찮을 것 같다는 생각을 했다. 이 스키마만 떼어내서 별도의 인증만 관리하는 마이크로서비스를 구현해도 좋을 것 같다.
Appendix
A. VSCODE 점유율 문제
지난 주였을 것 같다. visual studio code가 업데이트 된 이후 한 VSCODE 프로젝트 창마다 CPU 점유율이 200%를 치고 있었다(feat. htop). 몇개의 의심되는 Extension을 disabled 해도 해결이 안되었고, Developer: Show Running Extensions로 로깅해봐도 문제가 해결되지 않았다. 심지어 Visual Studio Code Insiders까지 설치해보고 했지만 여전히 증상은 그대로 TypeScript 인텔리센스 기능도 동작하지 않았다. PC 재부팅을 여러번 해도 나아지지 않아서 오기를 가지고 htop을 켜고 익스텐션을 하나씩 제거하기 시작했다.
원인: Setting Sync
VSCODE 자체적으로 Setting Sync가 동작하기 때문인지 알 수 없지만, 이 녀석이 200% 점유율을 만들어내고 있었다. 대략 5시간 삽질 끝에 알아냈으며 유용하게 잘 쓰던 이 익스텐션은 역사 속으로...
B. Terraform forcing replacement 이슈
매번 배포할 때 마다 Auth 서비스를 강제로 Replacement 하는 이슈가 있다.
이런 경우 라이프사이클을 지정해서 변경점을 무시하도록 일단 설정해둔다.
  lifecycle {
    ignore_changes = [
      cluster,
      iam_role,
      id,
      platform_version
    ]
  }