- Published on
tWIL 2022.11 3주차
- Authors

- Name
- eunchurn
- @eunchurn
다큐멘터리 필름
지난 8월경 의뢰를 받은 국립현대무용단 다큐멘터리 필름 "[댄스 온 에어] 메커니즘" 음악작업을 했고 상영일자는 11.10(목) 17:00 부터 11.24(목) 17:00까지 이며 유투브에 전체 버전이 올라왔다. 작업한 음원은 아래 영상에서 12분30초부터 16분10초까지 사용되었다. Analog Rytm의 림샷 소리를 주로 해서 Doefper의 Dark Time과 Dark Energy를 Culture Vulture로 찌그려뜨리면서 뽑은 신스잉을 몇시간 잼을 하며 녹음한 소스를 이어붙인 스코어다. 중간에 멜로디 라인이 있었다. Analog 4가 연주하는 소스인데 레코딩을 하지 않은 상태로 렌더링을 걸었더니 소스가 날라갔는데 나름 나쁘지 않았다. 음원은 별 것 없는데 영상에 붙이니 그럴듯하게 강렬해 보인다.
이번에 작업했던 곡과 원래 있어야할 멜로디 라인은 시간날 때 어느정도 발전 시켜 두어야 겠다.
Terraform 이슈들
드디어 이번주에 모든 앱에 담긴 amplify를 제거하고, Cognito까지 완전 제거하여 배포하였다. 관련 모든 인프라는 모노 리포로 관리하며, 프로젝트 별 리포는 CodeStar로 연결하여 관리하게 된다. 어떻게 보면 메인 API인 컨테이너와 마이크로 서비스격인 클라이언트들이 존재한다. ALB와 Target Group 만드는 방식은 유사한 코드가 많았지만 점진적인 배포와 동작 상태를 모니터링 해야했기에 Terraform 코드를 DRY(Don't Repeat Yourself)하게 유지하지 못했다. 나중에 재구성 한다면 구조화된 모듈을 잘 만들어야겠다는 생각이다. 지금은 더이상 인프라 코드에 시간을 더 쓸 여유가 없어서 이렇게 유지하면서 비즈니스 로직에 집중해야한다.
Blue Green 배포
ECS에서 Fargate로 운영하는 서비스는 CodeDeploy를 통해 배포를 하던지 ECR에 업데이트하고 트리거를 주는 방식으로 배포할 수 밖에 없다. 우리의 비즈니스 로직은 동일한 VPC에서 배포를 해야하는 이유가 있어서 어쩔 수 없이 CodeBuild에서 CI/CD가 동작하도록 구성했다. 추가 ECS 서비스를 배포해야하는 경우에도 이런 경우 Terraform 코드가 복잡해질 수 밖에 없는데 이 Blue-Green 배포 방식 때문이다.
Seamliess Blue/Green Deployment 포스트에서 Blue/Green 배포에 대해 자세히 설명되어있다.
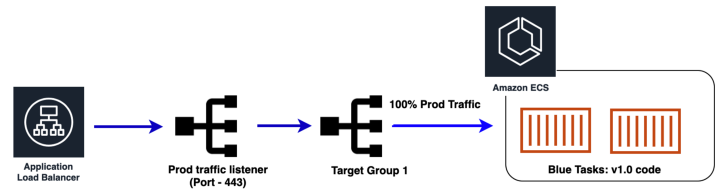
- 초기 Blue 스택
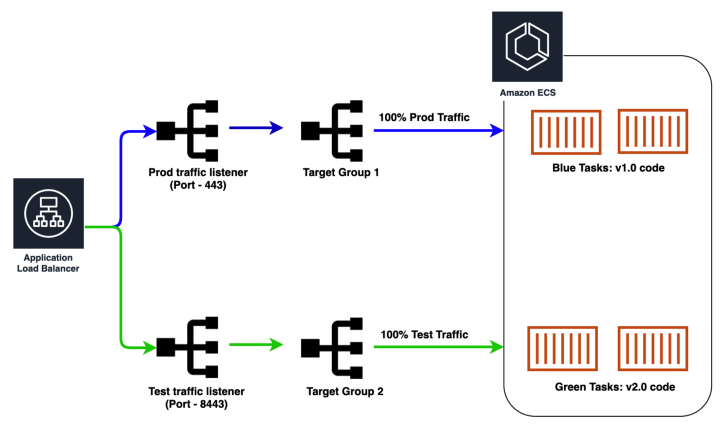
- Green 태스크를 띄우고 Green 트래픽을 Test 리스너로 보냄
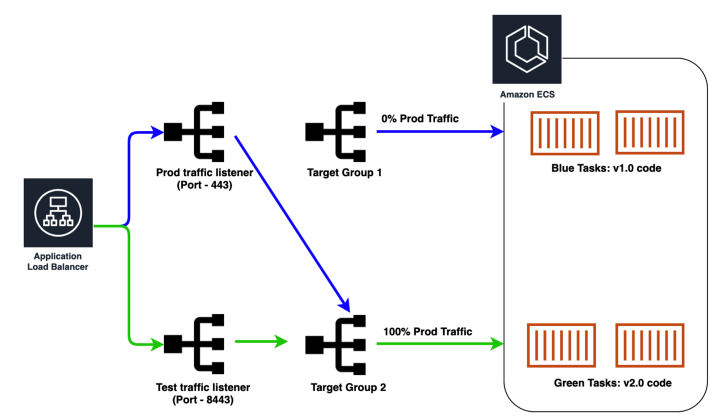
- Prod 트래픽을 Green 태스크로 100% 보냄
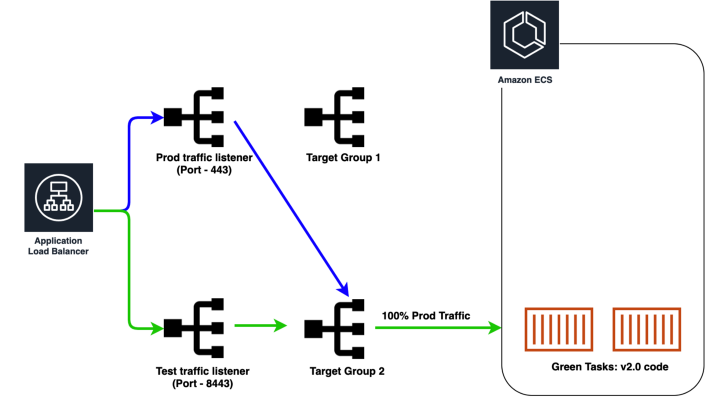
- Blue 태스크를 종료함
이렇게 Green 이 Prod 트래픽을 받고 있다가, 다른 인프라 수정할 건이 있어서 terraform apply를 하면 종료된 Blue target으로 트래픽을 보내게된다.
이렇게 현재 서비스가 동작하는 Target Group이 Blue 인지 Green 인지 확인하면서 Terraform 배포를 하는 말도 안되는 경우가 생겨버린다. 현재 서비스상태를 읽어와서 Blue 타겟 아니면 Green 타겟을 ALB에 붙여주려고 했는데 Terraform은 그렇게 설계되지 않았다고 한다. 참고: Ignore if resource exists
Terraform's language does not include features for this sort of dynamic operation because the intent is that your configuration is a description of the intended result, not a description of how to achieve that result. Terraform expects that it is either managing an object or it isn't; conditionally owning an object is not part of its model.
만약 생성하고 배포하려는 인프라가 담긴 코드에서 해당 인프라의 상태를 읽어오고 싶다면 external_data-sources를 사용하여 스크립트를 만들어 실행해야 한다. 음 이건 배꼽이 더 커져버린 상황이 되어버린다. 그렇다면 ALB Listener는 초기 배포 이후에 수정할 일이 거의 없다. 만약 있다면 그때 Blue Green을 잘 확인해서 수정하도록 해야겠다는 생각이다. 그래서 지속적인 배포 과정에서 lifetcycle meta 변수를 설정해서 ALB Listener가 바뀌지 않게 해야한다. 안그러면 갑자기 서버가 없는 상태가 되버리니...
resource "aws_alb_listener" "application" {
  load_balancer_arn = aws_alb.alb_application.arn
  port              = 443
  protocol          = "HTTPS"
  ssl_policy        = "ELBSecurityPolicy-2016-08"
  certificate_arn   = var.certificate.arn
  depends_on        = [aws_alb_target_group.alb_target_group_blue]

  default_action {
    target_group_arn = aws_alb_target_group.alb_target_group_blue.arn
    type             = "forward"
  }
  lifecycle {
    ignore_changes = [default_action.0.target_group_arn]
  }
}
괜찮은 BP는 여기를 참고하면 좋을 것 같다. terraform-aws-ecs-service-blue-green-deployment
공식 Tutorial에는 Canary 배포까지 자세히 설명되어 있다. EC2 서버 예제이지만 참고할 만한 내용은 많은 것 같다. 나중에 조금 자세히 읽어보고 Blue-Green, Canary 그리고 두개의 릴리즈를 스케쥴링 하는 Rolling 배포까지 공부해야겠다.
CodeBuild 캐싱
추가한 ECS 서비스는 Docker 이미지를 Multi-stage builds방식으로 Nextjs를 배포했다. 하지만 배포시간이 너무 오래걸리고 NAT 사용하는 비용이 염려되어 AWS CodeBuild의 빌드 캐싱을 시도해봤지만, Docker의 deps 스테이지도 캐싱이 안되었다. build는 말할 것도 없고, runner스테이지는 심지어 deps에서 설치한 내용도 공유가 되지 않더라 분명 내 PC에서는 동작했는데 Docker 버전이 다른 이유인지 알 수 없었다. Docker 문제는 build 스테이지에서 runner까지 실행시켜서 해결을 한 상태였고, 캐싱이 마이너한 문제로 남아있긴 한데, Reducing Docker image build time on AWS CodeBuild using an external cache 이 내용도 살펴보면서 캐싱을 적용해 봐야겠다.
  build:
    on-failure: ABORT
    commands:
      - echo Docker Image Build started on `date`
      - echo Pull previous docker image
      - $(aws ecr get-login --no-include-email)
      - docker pull ${ecr_repository_url}:latest || true
      - echo Building the Docker image...
      - docker build --cache-from ${ecr_repository_url}:latest -t ${repository_name} .
      - docker tag ${repository_name}:latest ${ecr_repository_url}:latest
SIGKILL on terraform apply running
Terraform apply 도중에 KILL을 했을 경우 Remote backend에서 Lock이 걸리고만다. 이럴땐 오류가 발생한 ID값을 읽어서
terraform force-unlock {id}
수행해준다. -lock=false 옵션은 매우 위험하다. 참고
Business logic
SuperTokens를 적용하고 나서 코드가 매우 단순 명료해졌다. 기존에 사용하던 Redux store를 수정하다가 파일 업로드에서 Progress를 적용했었는데 이제는 GraphQL Upload로 변경해야 했다. Amplify가 없었다면 GraphQL upload를 만들어서 사용했을 텐데 처음부터 Redux에 Thunk로 만들어 사용 한 Amplify의 Storage를 사용하다보니 이걸 변경하기 여간 손이 많이 가는 일이 아니었다. Upload스칼라 타입으로 변경해서 Apollo Client의 useMutation을 필요한 곳에 사용하면 되는데 이 hook은 Redux에 담을 수 없다. 결국 Storage를 사용하는 모든 코드를 수정해야해서 깊은 빡침이 올라오고 있었다.
1차:
graphql-request모듈을 사용해보자. 어찌어찌해서 만들기는 했지만, data flow는 stateless 하다. Progress를 받을 수 없기에 이걸 사용하는 모든 코드를 제거해야하는데, 기획에서 쓴다고 필요하다고 하면 원래대로 모든 Reduxdispatch를 지우고useMutation으로 가야한다.2차(해결):
@apollo/client의client를 사용할 수 있다.(이걸 미처 생각을 못했다.) 아폴로 클라이언트는 Link를 통해 data flow를 stateful하게 유지할 수 있다.

API는 upload라는 Mutation이 있고, Response는 String이다. (S3 URL) 일단 graphql-codegen으로 만들어진 UploadDocument를 사용하고, 순수 함수로 구현하면 Redux가 사용 할 함수는 다음과 같다. progressCallback을 받을 수 있다.
type FileUpload = {
  file: File;
  fileKey: string;
  progressCallback?: (progress: ProgressEvent) => any;
};

async function fileUpload({
  file,
  fileKey,
  progressCallback,
}: FileUpload): Promise<string> {
  const uploadResult = await client
    .mutate<UploadMutation>({
      mutation: UploadDocument,
      variables: { file, fileKey },
      context: {
        headers: {
          "apollo-require-preflight": true,
        },
        fetchOptions: {
          useUpload: true,
          onProgress: progressCallback,
          onAbortPossible: (abortHandler: any) => {
            console.log(abortHandler);
          },
        },
      },
    })
    .catch((e) => {
      console.error(e);
      throw e;
    });
  if (!uploadResult) throw new Error("Upload failed");
  const { data } = uploadResult;
  if (!data) throw new Error("Upload failed");
  const { upload } = data;
  if (!upload) throw new Error("No response");
  return upload;
}
사실 이런 함수를 만들기전에 Apollo Client의 Link에서 customFetch 설정을 해주어야 한다. fetchOptions가 저렇게 설정되어 있는지 아폴로 링크를 살펴보면
import { InMemoryCache, ApolloClient } from "@apollo/client";
import { createUploadLink } from "apollo-upload-client";

const customFetch = (uri: any, options: any) => {
  if (options.useUpload) {
    return uploadFetch(uri, options);
  }
  return fetch(uri, options);
};

const httpLink = createUploadLink({
  uri: getApiDomain(),
  fetch: customFetch as any,
});

export const client = new ApolloClient({
  cache: new InMemoryCache(),
  link: httpLink,
});
uploadFetch는 아래처럼 XMLHttpRequest를 사용한다. 45-47라인을 살펴보면 onprogress에 options의 onProgress함수를 연결해준다.
const parseHeaders = (rawHeaders: any) => {
  const headers = new Headers();
  // Replace instances of \r\n and \n followed by at least one space or horizontal tab with a space
  // https://tools.ietf.org/html/rfc7230#section-3.2
  const preProcessedHeaders = rawHeaders.replace(/\r?\n[\t ]+/g, " ");
  preProcessedHeaders.split(/\r?\n/).forEach((line: any) => {
    const parts = line.split(":");
    const key = parts.shift().trim();
    if (key) {
      const value = parts.join(":").trim();
      headers.append(key, value);
    }
  });
  return headers;
};

export const uploadFetch = (url: string, options: any) =>
  new Promise((resolve, reject) => {
    const xhr = new XMLHttpRequest();
    xhr.onload = () => {
      const opts: any = {
        status: xhr.status,
        statusText: xhr.statusText,
        headers: parseHeaders(xhr.getAllResponseHeaders() || ""),
      };
      opts.url =
        "responseURL" in xhr
          ? xhr.responseURL
          : opts.headers.get("X-Request-URL");
      const body = "response" in xhr ? xhr.response : (xhr as any).responseText;
      resolve(new Response(body, opts));
    };
    xhr.onerror = () => {
      reject(new TypeError("Network request failed"));
    };
    xhr.ontimeout = () => {
      reject(new TypeError("Network request failed"));
    };
    xhr.open(options.method, url, true);

    Object.keys(options.headers).forEach((key) => {
      xhr.setRequestHeader(key, options.headers[key]);
    });

    if (xhr.upload) {
      xhr.upload.onprogress = options.onProgress;
    }

    xhr.send(options.body);
  });
이렇게 기존 다른 비즈니스 로직을 수정하지 않도록 Thunk 함수만 변경 해주었다.
Schema 수정
이제까지 별생각 없이 DB의 Primary key를 @id @default(autoincrement())로 스키마를 지정했었는데 UUID키를 사용할 필요가 느꼈다. 사용자 브라우저에 Router에 숫자가 있는 상태가 좀 보안상 문제가 있지 않을까 하여... 찾아보니 UUID와 increment PK는 언제 사용해야할까?라는 좋은 글이 있었다. 결론은 id는 그대로 사용하고, uniqueKey라는 UUID키를 사용하며, 클라이언트에서는 UUID로 쿼리를 사용하도록 조치했다.