- Published on
tWIL 2023.01 2주차
- Authors

- Name
- eunchurn
- @eunchurn
Apollo Client
로컬 상태 관리
기본적으로 Apollo Client는 GraphQL을 사용하여 원격 서버와 상호 작용 한다. 당연히 일부 애플리케이션 상태는 완전히 로컬이기 때문에 원격 서버가 필요 하지 않을 수 있다. 그렇기 때문에 Apollo 클라이언트를 사용하면 원격으로 가져온 상태와 함께 로컬 상태를 관리할 수 있다. 즉, API로 가져오는 데이터와 상태를 함께 상호 작용할 수 있다는 얘기다.
작동 방식
아폴로 클라이언트는 특정 필드를 쿼리할 때 로컬 데이터를 가져와서 채울 수 있으며, 동일한 쿼리에 로컬과 원격으로 가져온 필드를 모두 포함 할 수도 있다.

Local only: State management
클라이언트와 GraphQL을 설계할 때 로컬 필드를 @client방식으로 사용할 수 있지만, 여기서는 Local only를 생각해보기로 한다. API와 함께 사용하는 것은 cache 방식으로 비용이 많이 다는 쿼리를 임시 저장해 둘 수 있다. 왜 상태관리에 Apollo Client가 유용한지 고민해 보았다.
상태관리 툴은 요즘 어떤걸 쓸까 고민할 정도로 각자 나름대로 잘 발전하고 있다고 생각한다. 그중에 가장 많이 사용하는 Redux, 그리고 Context API를 주로 사용해 왔었다. 어떨때는 쓰기 급급하여 장단점을 고려하지 않고 Context API를 디폴트로 사용하며 필요한 경우 추가하였다. 하지만 확실하게 어떨 때 사용해야하는지는 정리할 필요가 있다.
- Context API: 날짜 선택 컴포넌트와 같은 그리고 반복적으로 사용되는 컴포넌트와 예외처리 훅은 Context API에 담는다. React가 제공하고, Redner prop 형태로 같은 상태를 들고 있는 공동 컴포넌트를
useContext로 사용할 수 있다. Context API를 사용한다면,useReducer와 함께 사용한다. 그리고 적절히 접근이 필요한 컨테이너에 프로바이더를 배치한다. 즉, 상태 뿐만 아니라 재사용 컴포넌트를 담아야 한다면 Context API에 담는다. - Redux: 리덕스는 순수 자바스크립트 라이브러리이기 때문에, 다양한 메서드가 담긴 클래스도 담을 수 있다. 일반적으로는 전역 상태관리 툴로 사용하지만, 그런 경우 어떤 상태관리 툴을 쓰던지 상관이 없다. Redux가 꼭 필요한 시점은 메서드를 담고 그 메서드를 동작시킬 때 매우 유용하였다. Context API로도 충분히 가능하지 않나 싶지만, 대부분 담을 메서드가 비동기 함수들이기 때문에 이런경우 Redux에 상태를 담는다. 다른 라이브러리로도 대체는 가능하다.
- Apollo Client: 상태 데이터들이 구조화가 되어 있는 경우 혹은 관계 형태로 연결되어 있는 경우 Apollo Client가 유리하다. 복잡도가 높은건 API에서 제공해야겠지만, 로컬에서 복잡한 데이터구조를 사용할 때도 있다. 이런 경우 GraphQL schema를 만들고 상태값들을 cache로 관리하면 정신건강에 좋을 것이라 생각한다. 단, GraphQL 스키마를 써야하기 때문에 메서드가 담긴 객체를 사용할 수 없다. 그리고 Render props는 당연히 안된다. Apollo Client는 GraphQL scalar로 표현되는 데이터만 관리할 수 있다. 필요에 따라 적절히 Redux dispatch도 Resolver에서 동작시키기도 한다.
그래서 이제 복잡도 높은 클라이언트는 이 3가지를 모두 사용한다. 장점만 가져다 쓰면서 적절히 3개의 상태관리 툴에서 메서드를 호출할 수 도 있다. 생각보다 복잡도를 줄여줄 수 있다.
예시
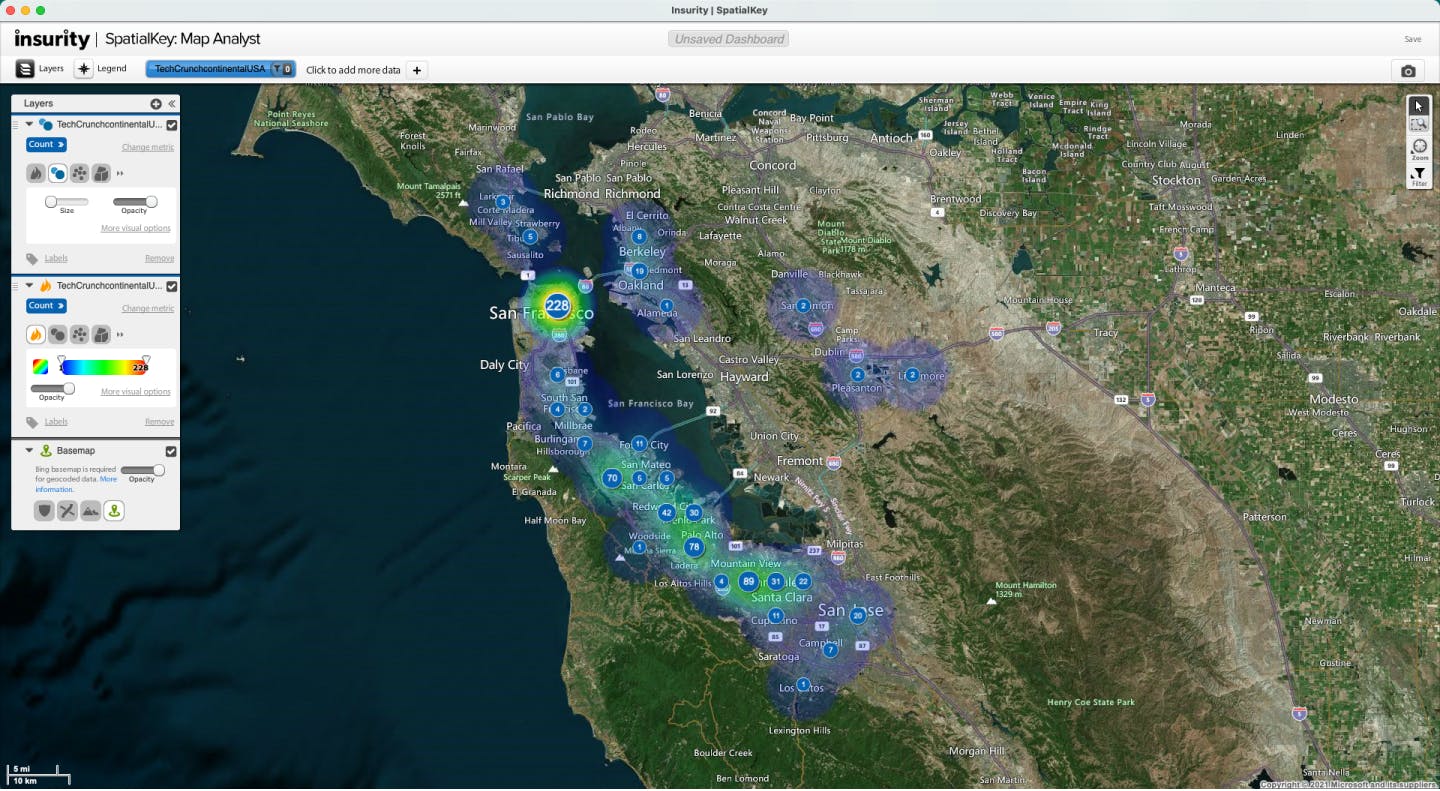
한가지 예시를 들자면, Company Funding Records(The TechCrunch Continental USA file is a listing of 1,460 company funding records reported by TechCrunch. As part of the import process, geocode these records using the city and state information in the file. Try adding another map layer with the Dataset Configuration Panel so you can visualize both a heatmap and graduated circles with the same dataset.)
이 데이터 셋을 DB가 아닌 CSV파일로 받아온다고 가정하고, 맵을 구동시키는 메서드 그리고 맵위에 데이터를 뿌려주는 메서드를 만들고, 날짜 시간 범위를 선택하는 컴포넌트를 만들었다고 가정한다.
CSV Parser
일단 fetch API로 로컬 CSV파일을 public에 담고 읽어온다.
export async function fetchCsv(path: string) {
  const response = await fetch(path);
  const reader = response.body?.getReader();
  const decoder = new TextDecoder("utf-8");
  if (!reader) throw new Error("No reader found");
  const result = await reader.read();
  return decoder.decode(result.value);
}
papaparse를 이용하여 CSV파일을 읽어온다.
Apollo Client Local State
데모 프로젝트를 만들어보자. 앞선 CSV 데이터 Company Funding Records를 Apollo client에 담아서 쿼리를 보내는데 까지 예제를 만들어 보기로 하자.
npx create-react-app apollo-client-local-state --template=typescript
pnpm으로 패키지 매니저로 사용하도록 package-lock.json과 node_modules를 삭제한다.
cd apollo-client-local-state
rm -rf node_modules
rm package-lock.json
Dependencies를 설치
pnpm add @apollo/client graphql papaparse lodash
GraphQL codegen으로 스키마와 오퍼레이터를 생성할 예정이니 GraphQL codegen 그리고 플러그인을 설치해준다.
Dev Dependencies를 설치
pnpm add -D @graphql-codegen/cli @graphql-codegen/client-preset @graphql-codegen/introspection @graphql-codegen/typescript-apollo-client-helpers @graphql-typed-document-node/core @graphql-codegen/typescript-react-apollo @graphql-codegen/typescript-resolvers @types/papaparse @types/lodash
GraphQL Codegen 설정 파일을 프로젝트 루트에 만들어준다. src/generated폴더에 index.ts, apollo-helper.ts, apollo.ts, resolvers.ts를 생성할 것이다. 그리고 스키마는 src/contexts/ApolloProvider/schema.graphql로 만들 것이다.
import type { CodegenConfig } from "@graphql-codegen/cli";

const config: CodegenConfig = {
  overwrite: true,
  schema: "src/contexts/ApolloProvider/schema.graphql",
  documents: "src/**/*.graphql",
  generates: {
    "src/generated/": {
      preset: "client",
      plugins: [],
    },
    "./src/generated/apollo-helper.ts": {
      plugins: ["typescript-apollo-client-helpers"],
    },
    "./src/generated/apollo.ts": {
      plugins: [
        "typescript",
        "typescript-operations",
        "typescript-react-apollo",
        "typescript-resolvers",
      ],
      config: {
        withHooks: true,
      },
    },
    "./src/generated/resolvers.ts": {
      plugins: ["typescript", "typescript-resolvers"],
      config: {
        useIndexSignature: true,
      },
    },
  },
};

export default config;
package.json에 코드젠 스크립트는
{
  "scripts": {
    "codegen": "graphql-codegen --config codegen.ts"
  }
}
Schema
CSV파일의 헤더로 스키마를 만들어준다.
permalink,company,numEmps,category,city,state,fundedDate,raisedAmt,raisedCurrency,round
초기 스키마는 데이터 타입과 필드 타입 그리고 Query 타입은 모든 데이터 getAllData와 getDataByField로 필드와 일치하는 데이터를 가져오도록 한다.
type Data {
  permalink: String
  company: String
  numEmps: String
  category: String
  city: String
  state: String
  fundedDate: String
  raisedAmt: String
  raisedCurrency: String
  round: String
}

enum Field {
  permalink
  company
  numEmps
  category
  city
  state
  fundedDate
  raisedAmt
  raisedCurrency
  round
}

type Query {
  getAllData: [Data]
  getDataByField(field: Field!, value: String!): [Data]
}
이제 src안의 어느 위치든 사용하고지 하는 GraphQL operation을 만들어 둔다. 일단 모든 데이터를 가져오는 getAllData오퍼레이션은
query allData {
  getAllData @client {
    permalink
    company
    numEmps
    category
    city
    state
    fundedDate
    raisedAmt
    raisedCurrency
    round
  }
}
그리고 getDataByField도 만들어준다.
query getDataByField($field: Field!, $value: String!) {
  getDataByField(field: $field, value: $value) @client {
    permalink
    company
    numEmps
    category
    city
    state
    fundedDate
    raisedAmt
    raisedCurrency
    round
  }
}
이제 별도로 TypeScript Type을 만들지 않고 제너레이터를 활용해서 가져오도록 한다.
pnpm codegen
Apollo Client
Apollo Client를 만들기 전에 resolvers 매서드를 만들어준다. Generated된 Resolvers 타입을 이용한다.
import { InMemoryCache } from "@apollo/client";
import { Resolvers } from "generated/resolvers";
import { GetAllDataDocument } from "generated/graphql";
import { compact } from "lodash";

export const resolvers: Resolvers<{ cache: InMemoryCache }> = {
  Query: {
    getDataByField(_root, args, { cache }) {
      if (!args) throw new Error("No args");
      const { field, value } = args;
      const data = cache.readQuery({ query: GetAllDataDocument });
      if (!data) return null;
      const { getAllData } = data;
      if (!getAllData) return null;
      const result = compact(
        getAllData.filter((item) => {
          if (!item) return null;
          return item[field] === value;
        })
      );
      return result;
    },
  },
};
여기서 getAllData는 cache 에서 직접 제공될 예정이므로 getDataByField만 Query로 만들어준다.
이제 Apollo Client를 생성하면서 InMemoryCache 생성자로 cache를 만들고 CSV Parsing한 데이터를 getAllData쿼리의 값으로 넣어준다.
import { ApolloClient, InMemoryCache } from "@apollo/client";
import Papa from "papaparse";
import { isEmpty } from "lodash";
import { GetAllDataDocument, Data } from "generated/graphql";
import { resolvers } from "./resolvers";

/**
 * It fetches a CSV file, decodes it, and returns the decoded string
 * @param {string} path - The path to the CSV file.
 * @returns A promise that resolves to a string
 */
async function fetchCsv(path: string) {
  const response = await fetch(path);
  const reader = response.body?.getReader();
  const decoder = new TextDecoder("utf-8");
  if (!reader) throw new Error("No reader found");
  const result = await reader.read();
  return decoder.decode(result.value);
}

/**
 * It takes a string of CSV data, and returns a promise that resolves to an array of objects
 * @param {string} rawCsv - string - the raw CSV data
 * @returns A promise that resolves to an array of data objects.
 */
function parseCsv(rawCsv: string): Promise<Data[]> {
  return new Promise((resolve, reject) => {
    Papa.parse(rawCsv, {
      header: true,
      complete(results: Papa.ParseResult<Data>) {
        if (isEmpty(results.data)) return reject("empty");
        return resolve(results.data);
      },
    });
  });
}

/**
 * GetData fetches a CSV file from a given path, parses it, and returns the parsed data.
 * @param {string} path - The path to the CSV file.
 * @returns An array of objects.
 */
async function getData(path: string) {
  const rawCsv = await fetchCsv(path);
  const parsedData = await parseCsv(rawCsv);
  return parsedData;
}

const cache = new InMemoryCache();

getData("TechCrunchcontinentalUSA.csv").then((data) => {
  cache.writeQuery({ query: GetAllDataDocument, data: { getAllData: data } });
});

export const client = new ApolloClient({
  cache,
  resolvers,
});
이제 src/contexts/ApolloProvider/index.tsx 파일을 만들고 ApolloProvier를 만들어준다.
import { ApolloProvider } from "@apollo/client";
import { client } from "./client";

export function ApolloClientProvider({
  children,
}: {
  children: React.ReactNode;
}) {
  return <ApolloProvider client={client}>{children}</ApolloProvider>;
}
이 프로바이더를 App에 감싸주고 테스트 해보자. 우선 @tanstack/react-table을 설치하여 Headless 테이블을 만들고, 생성된 타입으로 columns을 만들어준다.
import { Field, Data } from "generated/apollo";
import { compact } from "lodash";

type OmittedData = Omit<Data, "__typename">;

const columnHelper = createColumnHelper<OmittedData>();

const columns = compact(
  Object.values(Field).map((columnKey) =>
    columnHelper.accessor(columnKey, {
      cell: (info) => info.getValue(),
      header: () => columnKey,
    })
  )
);
그리고, undefined가 오는 경우 defaultData를 줄 수 있도록 한다. Lazy Query로 가져오기 때문에 기본 데이터가 있어야 한다.
const defaultData: OmittedData[] = Object.values(Field).map((value) => ({
  [value]: "",
}));

function getData(data: GetDataByFieldQuery | undefined): OmittedData[] {
  if (!data) return defaultData;
  const { getDataByField } = data;
  if (!getDataByField) return defaultData;
  const result = compact(getDataByField.map((data) => omitBy(data, "__typename"))) as OmittedData[];
  return result;
}
Apollo Client 에서는 계속 __typename이 딸려오기 때문에 테이블을 그리기 위해선 omit시켜야 한다. 이렇게 하여 전체 캐시 데이터와 City가 "Palo Alto"인 경우의 데이터를 가져와본다.
import React from "react";
import {
  createColumnHelper,
  useReactTable,
  getCoreRowModel,
  flexRender,
} from "@tanstack/react-table";
import "./App.css";
import {
  useGetDataByFieldLazyQuery,
  Field,
  Data,
  GetDataByFieldQuery,
} from "generated/apollo";
import { compact, omitBy } from "lodash";

type OmittedData = Omit<Data, "__typename">;

const columnHelper = createColumnHelper<OmittedData>();

const columns = compact(
  Object.values(Field).map((columnKey) =>
    columnHelper.accessor(columnKey, {
      cell: (info) => info.getValue(),
      header: () => columnKey,
    })
  )
);

const defaultData: OmittedData[] = Object.values(Field).map((value) => ({
  [value]: "",
}));

function getData(data: GetDataByFieldQuery | undefined): OmittedData[] {
  if (!data) return defaultData;
  const { getDataByField } = data;
  if (!getDataByField) return defaultData;
  const result = compact(
    getDataByField.map((data) => omitBy(data, "__typename"))
  ) as OmittedData[];
  return result;
}

function App() {
  const [getDataQuery, { data: filteredData }] = useGetDataByFieldLazyQuery();
  const data = React.useMemo(() => getData(filteredData), [filteredData]);
  const table = useReactTable({
    data,
    columns,
    getCoreRowModel: getCoreRowModel(),
  });

  return (
    <div className="p-2">
      <button onClick={() => getDataQuery()} className="border p-2">
        All City
      </button>
      <button
        onClick={() =>
          getDataQuery({ variables: { field: Field.City, value: "Palo Alto" } })
        }
        className="border p-2"
      >
        Palo Alto
      </button>
      <table>
        <thead>
          {table.getHeaderGroups().map((headerGroup) => (
            <tr key={headerGroup.id}>
              {headerGroup.headers.map((header) => (
                <th key={header.id}>
                  {header.isPlaceholder
                    ? null
                    : flexRender(
                        header.column.columnDef.header,
                        header.getContext()
                      )}
                </th>
              ))}
            </tr>
          ))}
        </thead>
        <tbody>
          {table.getRowModel().rows.map((row) => (
            <tr key={row.id}>
              {row.getVisibleCells().map((cell) => (
                <td key={cell.id}>
                  {flexRender(cell.column.columnDef.cell, cell.getContext())}
                </td>
              ))}
            </tr>
          ))}
        </tbody>
        <tfoot>
          {table.getFooterGroups().map((footerGroup) => (
            <tr key={footerGroup.id}>
              {footerGroup.headers.map((header) => (
                <th key={header.id}>
                  {header.isPlaceholder
                    ? null
                    : flexRender(
                        header.column.columnDef.footer,
                        header.getContext()
                      )}
                </th>
              ))}
            </tr>
          ))}
        </tfoot>
      </table>
      <div className="h-4" />
    </div>
  );
}

export default App;
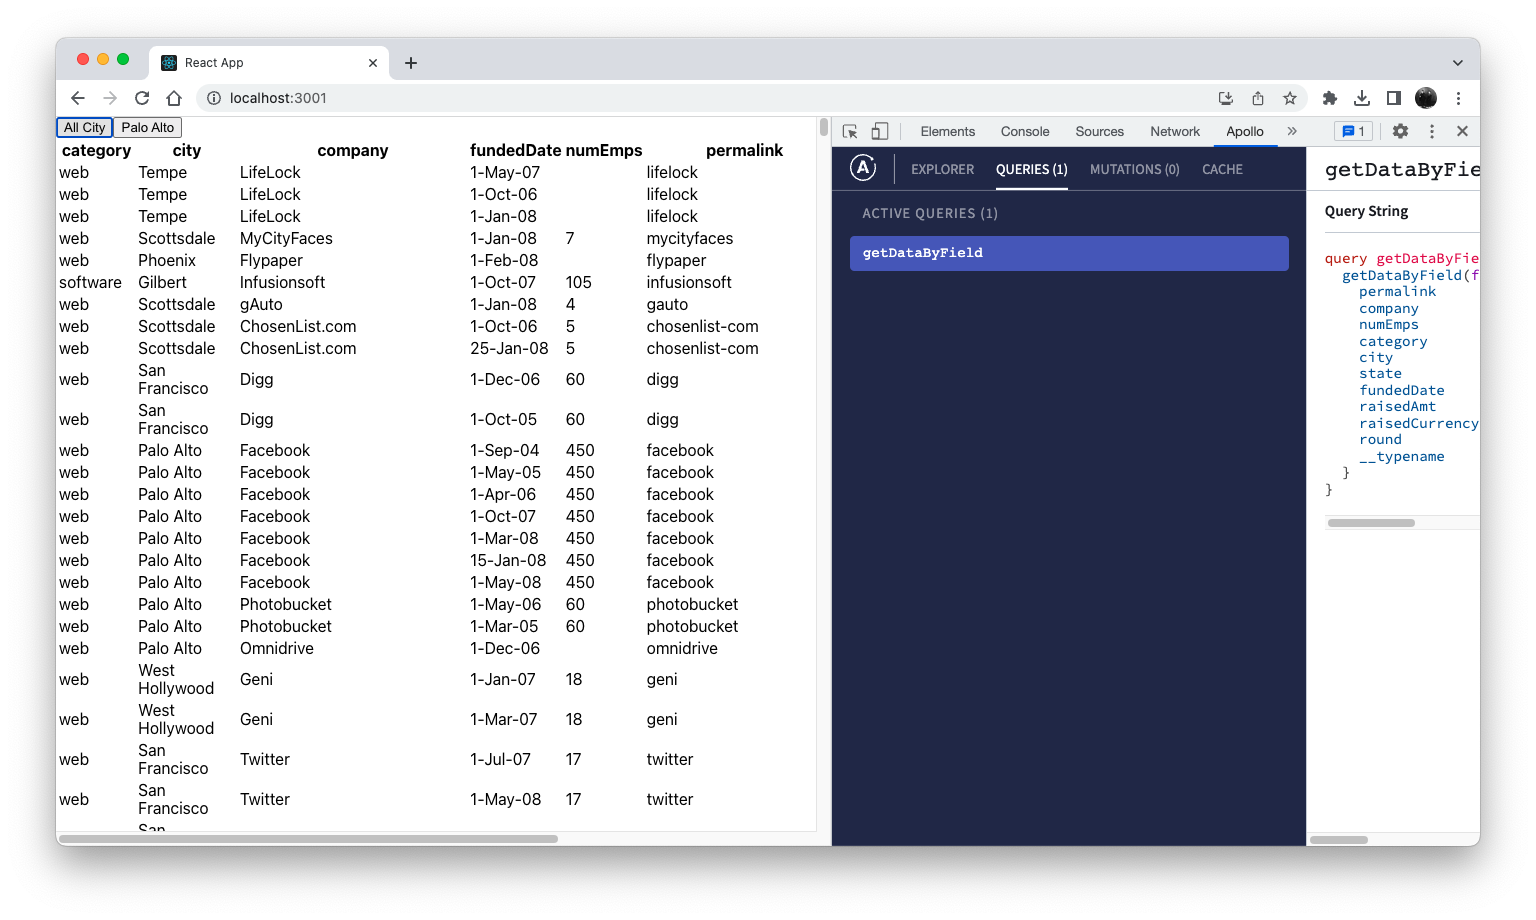
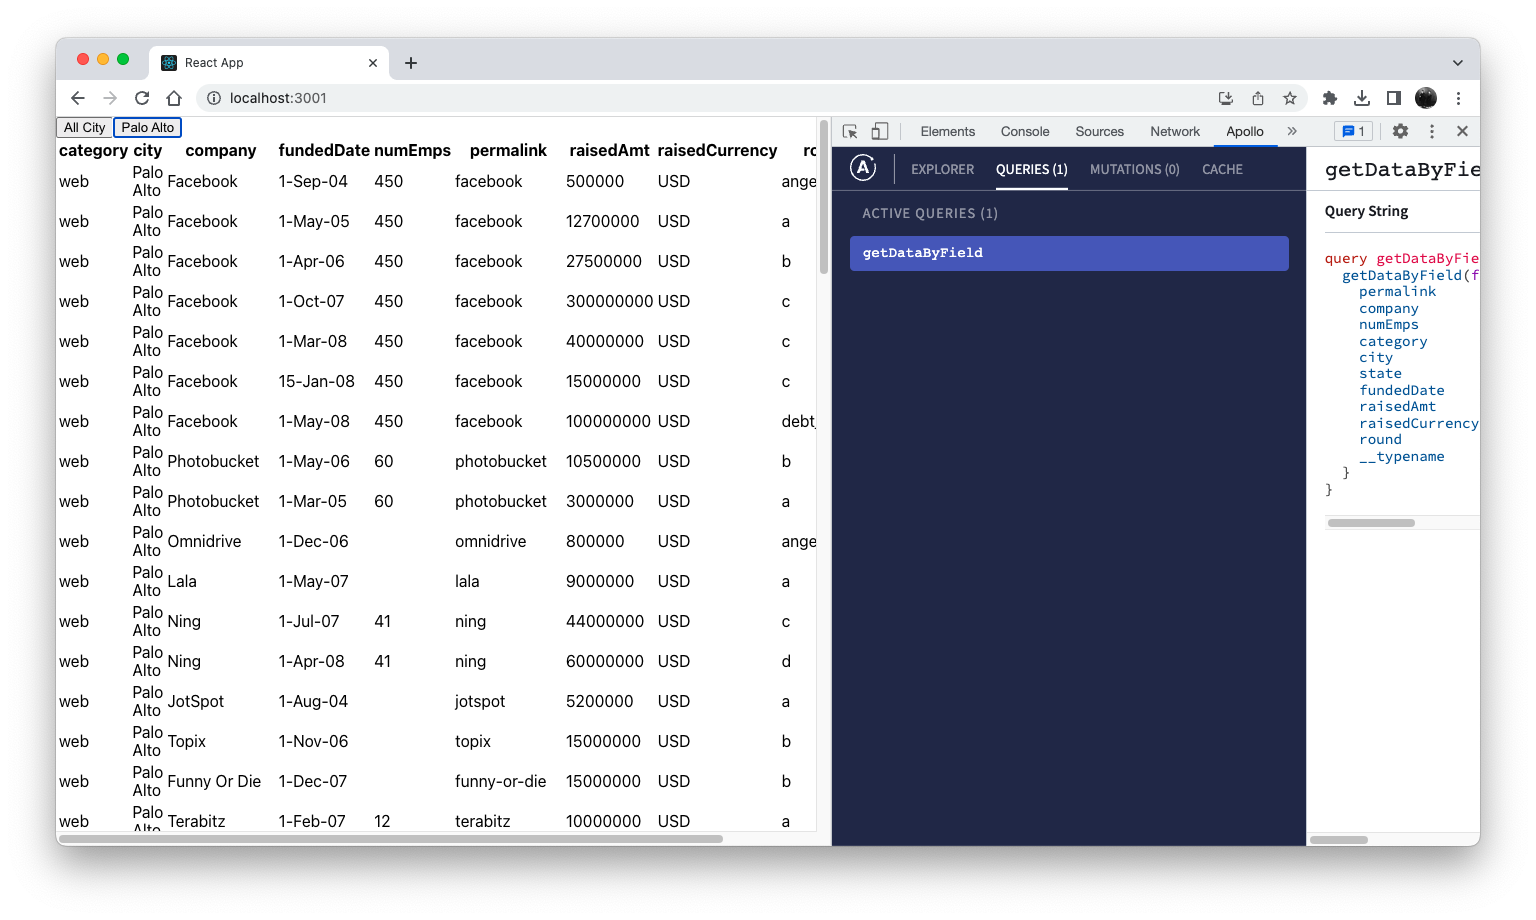
Chrome의 Apollo Client Extension을 설치해서 함께보면 Query를 확인할 수 있다.
- 기본값을 가져옴

- 전체 캐시 데이터 가져오기
- City: Palo Alto 인 데이터 가져오기
Wrapping up
맞아 Gatsby.js는 아마 이렇게 사용할 것 같다. Markdown 파일을 구조와 하여 로컬 캐시에 저장할 것 으로 보이는데 자세한 내용은 들여다 봐야겠지만 GraphQL nesting이 아주 잘되어있다. (블로그도 다시 Gatsby.js로 돌아가고 싶지만...) 하지만 만들어준 스키마만을 사용해야하는지 내가 더 커스터마이징 할 수 있는지 확인해봐야 한다.
Mutation 추가하여 Redux에 담긴 DOM과 DOM을 제어하는 메서드들을 호출하는 예제는 나중에 작성해 보려고 한다. Three.js 사용하다 보면 이렇게 제어할 경우 데이터 조작과 동시에 Three.js 요소들을 제어할 수 있을 것이라 매우 편할 것으로 생각한다. (상태 저장소엔 데이터만 있는것이 아니라서...)
Apollo Client와 InMemoryCache를 사용하여 상태관리를 해야하는 이유는 상태 관리 대상의 데이터를 구조화 하기 위해서였다. 프로젝트 규모가 커지다 보면, 단지 값을 몇개 바꾸기 위해 리듀서가 많아지고, 상태 뿐만 아니라 리듀서도 복잡해진다. 마치 REST API 엔드포인트가 기능마다 늘어나는 것과 유사하게... 따라서 우리 개발자들에게는 많이 익숙한 GraphQL로 구조화된 상태를 관리하는 것이 현재로써는 좋은 대안이 된다고 생각한다.
언젠가 브라우저에 상태관리를 위해 SQLite가 장착될 수 도 있겠지만, 웹기술은 빠르게 발전 하는 반면 브라우저는 꽤 보수적이어서 모든 브라우저에 기능이 탑재되는데는 많은 시간이 걸릴 것으로 본다. 크롬의 WebSQL은 더이상 유지관리가 되지 않으며, IndexedDB는 브라우저 표준 인터페이스로 사용된다고 한다. 아직 써보지는 않았지만 예제들을 보면 초기에 지원하는 브라우저인지 예외처리하는 과정이 있는 것을 보니 아직 지원되지 않는 브라우저가 있는 것 같다.
XState라는 유한 상태 기계(Finite State Machines) 컨셉을 소프트웨어 개발 방법(모던 웹)에 도입한 상태 기계와 상태 차트라고 한다. 시간이 되면 한번 가이드를 따라해보고 가능성을 파악하고 프로젝트에 적용해보고 싶다(여기저기서 좋다는 소문이 자자하여). 대학원 수업 때 유한 상태 기계를 배운적이 있는 것 같은데 졸았던 것 같다.
현재까지는 Context API, Redux, Apollo Client를 조합하여 사용하되, 아직 백엔드 스키마와 클라이언트 스키마를 조합하여 Codegen을 하는 것도 복잡한 것 같아서 클라이언트는 캐싱은 말그대로 fetch를 줄이는 용도로 사용하며, 로컬에서 사용하는 상태 관리의 스키마는 백엔드 스키마와 동일하게 만들 필요는 있어보인다. 앞으로 진행하는 프로젝트는 복잡도가 굉장히 많이 올라갈 예정이기 때문에(3D 모델과 특성 데이터를 구조화 해야함) 적당히 @client directive를 사용하여 로컬에서 3D 모델들을 변경하다가 저장 시점에 백엔드로 내려주어야 한다. 결국 클라이언트에서는 Resolvers 함수를 잘 만들어 주어야 한다.